How To Organize And Rename Albums In iTunes
When you purchase and download items from the store, iTunes and Apple Music sometimes fail to give you the correct names, proper album cover art and even the appropriate location. These lacking will be fixed one by one, as this post will walk you through the complete guide on how to rename albums in iTunes and how to manage them, too.
As mentioned, in this post, expect to gain enough learnings about the process of how to change song information in iTunes as well as the simple steps on how you can organize them according to what you like. Learn as well about the perfect tool to use when it comes to permanently save your favorites on your computer.
Contents Guide Part 1. How to Rename a Song or Album in Your iTunes Library?Part 2. How to Add and Organize Albums in iTunes?Part 3. How to Permanently Save Albums and Playlists from iTunes and Apple Music?Part 4. Final Words
Part 1. How to Rename a Song or Album in Your iTunes Library?
The process to rename albums in iTunes is just simple. You can finish the process in just a few simple steps and you will be done for sure, in just a short time. Here is how you can change albums information in iTunes.
- Get started with launching the iTunes app on your computer.
- Right after that, proceed to your music collection to see the list of albums, playlists and tracks that you’ve collected so far.
- Browse your list and choose the album that you wish to rename. You can also just search for the album’s current name if you remember it.
- After doing so, do a right click on the album and select the Get Info option from the menu options displayed.
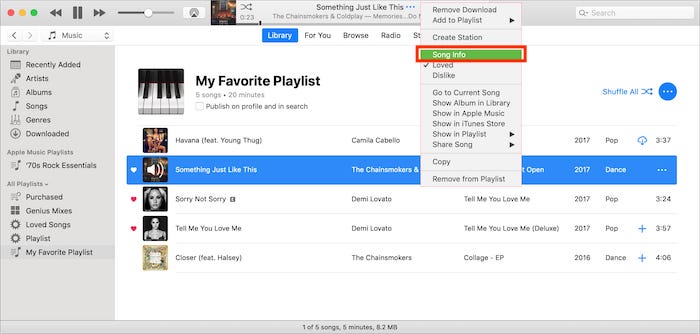
- In the Info section, all details related to the album will be shown. From here, you are allowed to edit anything that you want to change. This includes the name of the album.
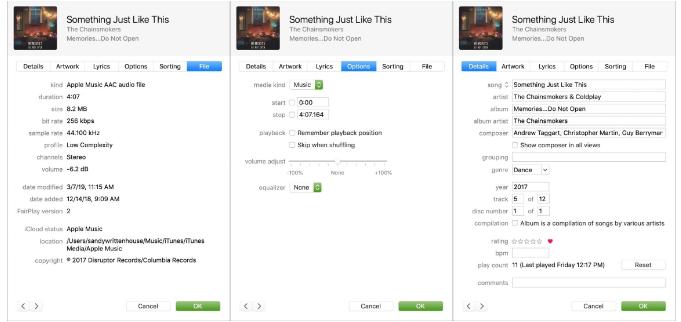
- After putting on your desired name, do not forget to click the OK button to save all the changes made.
Apart from using the iTunes app itself to rename albums in iTunes, you can also try to do it via the iTunes Store. Just launch it, and head to the My Music section or Store to select the album that you wish to rename. From the opening window, there is an Edit button right next to the album’s title. Tap on it to change its name and lastly, do not forget to select the OK button to save the new name.
Part 2. How to Add and Organize Albums in iTunes?
The tackled procedure above about how to rename albums in iTunes can be done with just a few steps alone. Renaming the album names in your iTunes app is just one way of organizing the files. Along with that, there are still more things to do when it comes to managing your library, such as saving or moving them into their respective locations.
After every purchase of a certain album from the iTunes Store, the files will automatically be saved on your iTunes app music library or the Apple Music app. This is the initial location of them, but you can always have them changed, especially if it seems inappropriate for you. Check out the steps below.
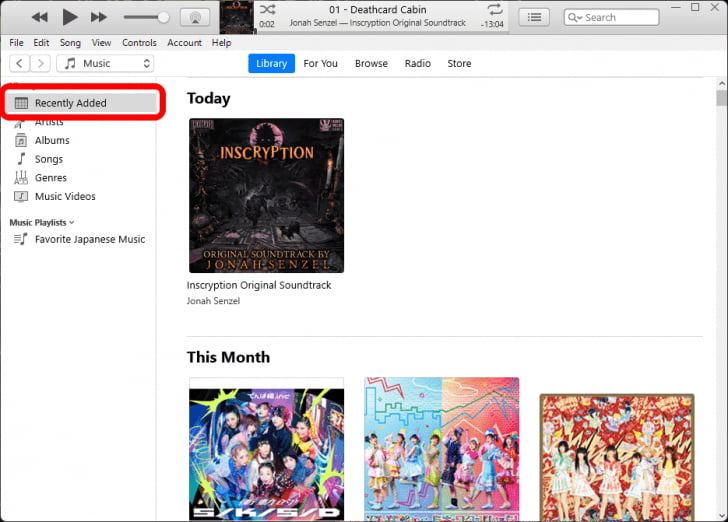
- The album newly saved may be seen in the Recently Added section or the Compilations folder. To get started, launch the iTunes app or the Music app and head to your library.
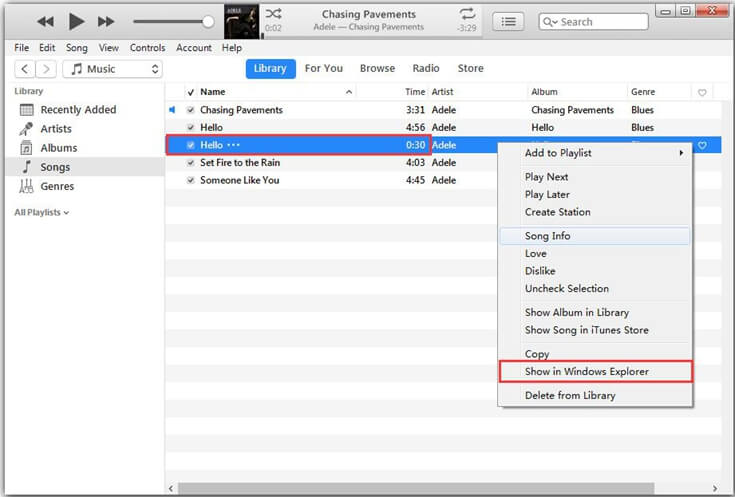
- Select the album in order to see the tracks saved inside it, and then do a right click on the first track shown on the list.
- In the menu window, select the option of Show In Windows Explorer or Show In Finder, to quickly see the Compilations folder.
- To begin organizing the items, head to the Music folder seen under File Explorer’s iTunes Media section.
- After that, create a new folder and name it with the artist that you wish to use for the album.
- Head to the original location of the album, right click on it and select the Cut or Copy option from the menu window. Then have the item pasted on its new location. This time, you have to open the newly created folder a while ago.
- Once finished, all you need to do now is to delete the original location. On the iTunes or Music app, go to the library and then right click on the album again. From the opening window, select Delete from Library.
Part 3. How to Permanently Save Albums and Playlists from iTunes and Apple Music?
By knowing the perfect alternative on how to save items from iTunes and Apple Music, you won’t have to perform the given procedure above about how to rename albums in iTunes. You can even set your own standards when it comes to organizing your saved files. To do this, you will have to use AMusicSoft Apple Music Converter.
When it comes to Apple Music DRM removal, AMusicSoft can do better, too. AMusicSoft Apple Music Converter is a very notable professional music converter which is very useful especially in procedures like download and conversion. This tool can already give results in just a couple of minutes because of its 16x faster speed. Even with this speed, the output is still of a good quality that will not show any trace of difference compared to the original copy.
Naming the formats that you may get using this tool, you can choose from MP3, WAV, FLAC, M4A, AC3, and AAC. After acquiring these files, transferring a copy from your computer into any other device will now be possible and easy. You can share these music to any one without limit and play iTunes music on Alexa or other devices.
To use AMusicSoft Apple Music Converter, see the steps provided below.
- First, get a copy of AMusicSoft Apple Music Converter from the website of AMusicSoft and install it on your device right after.
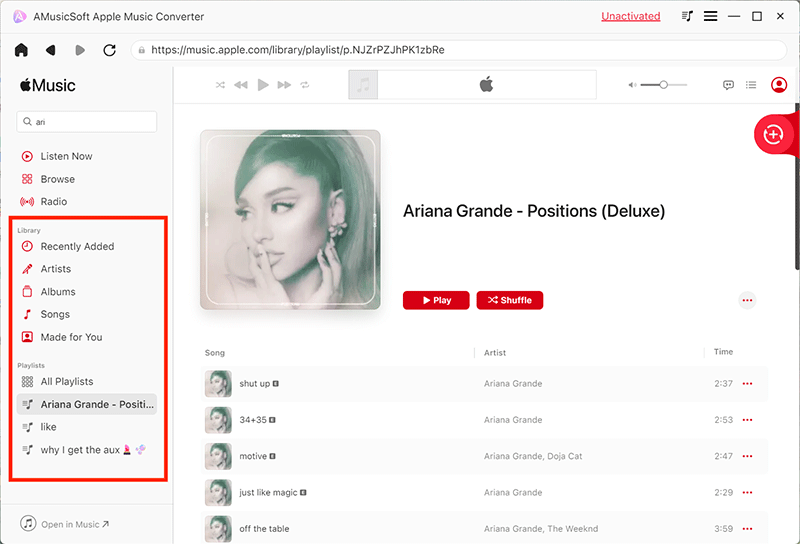
- Open the application and start selecting the chosen files to upload them into the music converter.
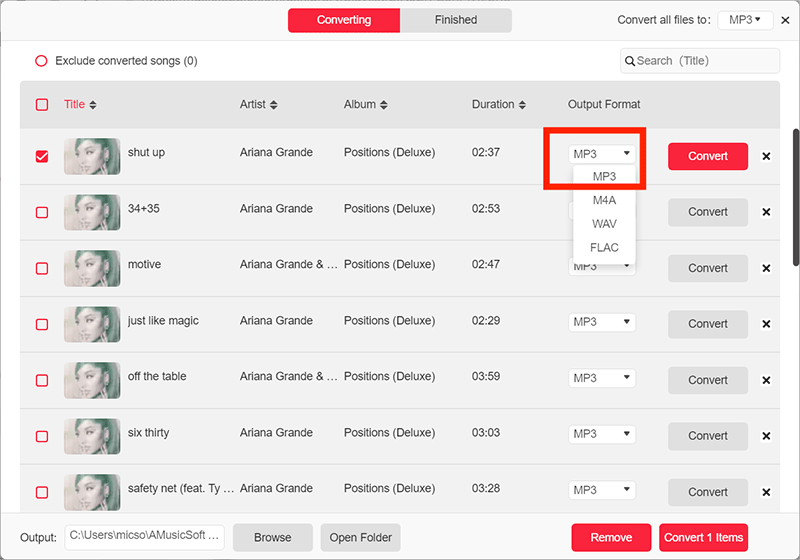
- Choose the format of conversion along with the output folder.
- Tap the Convert button to initiate the start of conversion.

- Get the results from the Converted menu and save them on your local computer.
Part 4. Final Words
The previous sections above provided us the simple procedure on how to rename albums in iTunes and the easy method on how you can organize your own set of playlists. All you have to do is to follow the given procedure above in order to follow your preferred details. Moreover, if you want to get the correct album with the correct name and location on your first try, make sure to use AMusicSoft Apple Music Converter. The detailed guide on how to use this tool is also shared above.
People Also Read
- Using iTunes On How To Create AAC Version?
- How To Play Windows Media On Mac [Best Three Solutions]
- Music Streaming Service Comparison: Which Is Better
- What Is iTunes Store Audio Format And How To Play?
- Let Us Enjoy The Apple Music Exclusives List
- How To Backup Your Playlists Via Apple CD Burner
- How To Use iTunes To Search For Music Added
- Easy Fixes For “iTunes Get Album Artwork Gone” Error
Robert Fabry is an ardent blogger, and an enthusiast who is keen about technology, and maybe he can contaminate you by sharing some tips. He also has a passion for music and has written for AMusicSoft on these subjects.