How to Convert iTunes To MP3 On Windows And Mac?
Are you currently looking for ways how to convert Apple Music or iTunes to MP3? This procedure is about to be discussed in this post and will surely help you stream your favorite Apple Music or iTunes songs on any music player of your choice.
It is a lot of hassle if you were to move every song that is saved on your iTunes music library into another music player, especially non-Apple devices, because you may be restricted by digital restrictions rights management (DRM). So you cannot play iTunes or Apple Music songs on other devices directly unless you have the songs converted to MP3. To help you with that concern, I have here the perfect solution if you are to convert songs to MP3.
Contents Guide Part 1. How to Convert Purchased iTunes Songs to MP3?Part 2. How to Convert DRM-Protected iTunes Songs to MP3?Part 3. Summary
Part 1. How to Convert Purchased iTunes Songs to MP3?
Can you convert iTunes to MP3? We are all aware that songs and any other items we purchase from Apple Music are protected with DRM. But to tell you, the items bought from iTunes are different from those of Apple Music because they are not encrypted with DRM protection. However, it is still necessary to double-check if the items are with DRM or not to avoid conflict when it comes to converting iTunes songs to MP3.
If you already have the items checked and found out that the items are DRM-free, then it would be easier and faster for you to convert iTunes songs from the original format of AAC to MP3 because you can conveniently process it through the help of iTunes app, itself and the original built-in Music app on Mac. Now, once the items are converted to MP3, you can easily have them streamed using other music players you have.
Convert iTunes Songs to MP3 Via iTunes
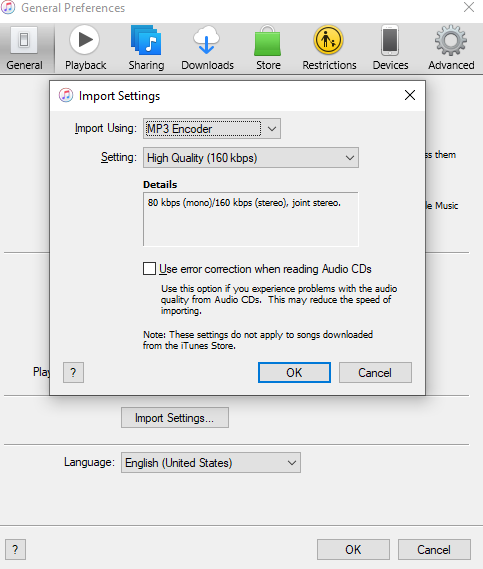
Step 1. Launch the iTunes application on Windows and Mac. On the Windows, click on Edit > Preferences. On Mac, go to iTunes > Preferences.
Step 2. Click the General tab, then click Import Settings > select MP3 Encoder for the Import Using option. Then click on “OK” to confirm.
Step 3. Back to your iTunes music library and select the songs you want to convert. Then hold down the “Option” key on your Mac keyboard followed by selecting File > Convert > Create MP3 Version. On Windows, hold down the Shift key and choose File > Convert > Create MP3 Version. Soon the converted files will appear in the music library next to the original songs.
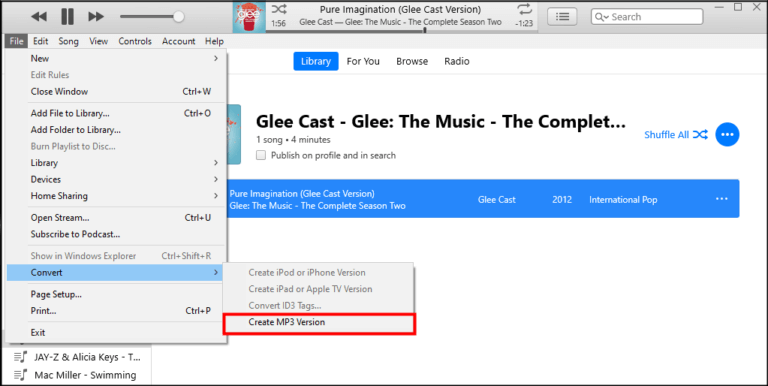
Within a few minutes, all of the selected songs will be processed. Check your music library then and see all the newly converted music files along with the original copies.
Convert iTunes Songs to MP3 Via Apple Music
Beginning with Macs running macOS Catalina, iTunes was replaced by separate apps, namely Music, Podcasts, and TV. If you use a Mac running the latest macOS, you should convert iTunes to MP3 via the Apple Music application. The default Music app provides you the capability to change the audio format.
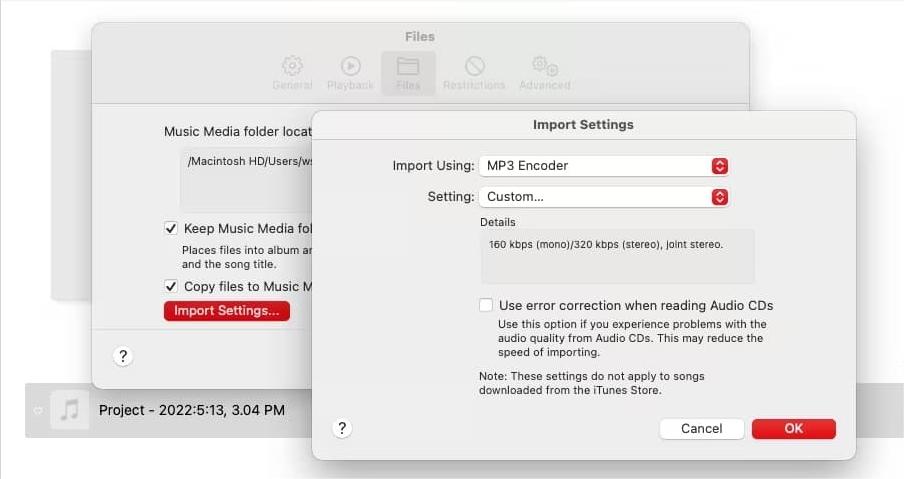
Step 1. Launch the Apple Music app on your Mac. In the menu bar, choose Music > Preferences > Files > Import Settings.
Step 2. Click the menu next to Import Using, then choose MP3 Encoder. Click OK.
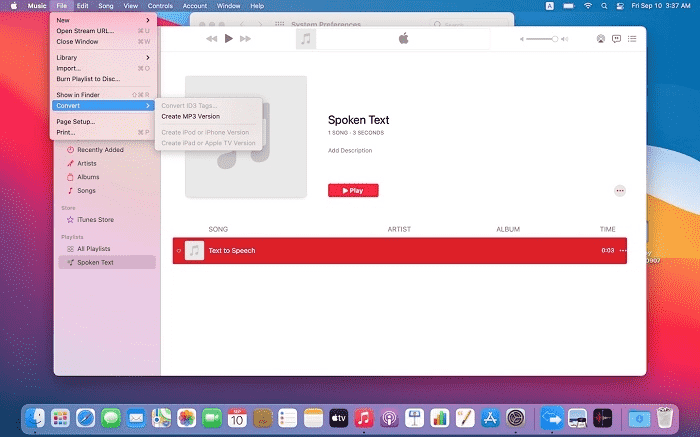
Step 3. Find the song or songs you want to convert to MP3 in Apple Music and single-click them. Choose File > Convert, then Create MP3 Version. New song files appear in your library next to the original files.
With iTunes's MP3 encoder, you can only convert music without DRM because Apple introduced its entire music catalog without DRM in January 2009. However, music and video from Apple Music is still protected by DRM, which limits devices capable of playing downloaded files.
Moreover, you may notice a decrease in sound quality when converting between MP3 and AAC. This is because both AAC and MP3 are compressed versions of the original song file and thus already of lower quality. Converting from AAC to another compressed format like MP3 means there will be even more compression and loss of quality. To enjoy more high-quality sound, you can try converting music to Apple Lossless Audio Codec (ALAC).
You may be interested: Apple Lossless VS AAC: Which One Is Better
To convert DRM-protected music from Apple Music without quality loss, you may need to explore alternative methods for conversion, such as an Apple Music to MP3 converter.
Part 2. How to Convert DRM-Protected iTunes Songs to MP3?
Aside from the set of procedures above on how to convert iTunes music to MP3 using the iTunes app on Windows and the native Apple Music app on Mac, there is actually another tool that you can use to have Apple Music songs from iTunes to MP3. This professional tool can help you as well to own the songs and keep them with you forever.
It was mentioned that the case in the Apple Music app is different from that of iTunes. Items that you purchase and download from the Apple Music app are protected with DRM making it impossible for you to have them converted directly. It is impossible as well to locate them and transfer them into other devices because they just cache files that could only be accessed within your Apple Music collection or library. But with the help of the tool AMusicSoft Apple Music Converter, you can have them all saved as local files on your computer. After doing so, you can have them transferred as well into other types of music players you have.
AMusicSoft Apple Music Converter is a versatile DRM removal software and music downloader, which is capable of removing DRM from iTunes or Apple Music audio files at 5X faster speed and converting them to MP3, MP4, AAC, M4A, FLAC, WAV, or other mainstream format files with lossless audio quality. With these DRM-free songs, you can back up them on any device and play with any media player you want. In this way, you won’t have the need to access the application ever or connect your device to the internet in order to listen to Apple Music offline.
To convert Apple Music or iTunes to MP3 for free by AMusicSoft, just follow the step-by-step guide enumerated below.
Step 1. Click the Free Download button to proceed with the download process. After downloading it, install and launch it on your device.
Step 2. Second, select all the songs that you wish to convert to MP3 format. On your music collection, mark the box before each song title to indicate that they have been selected.
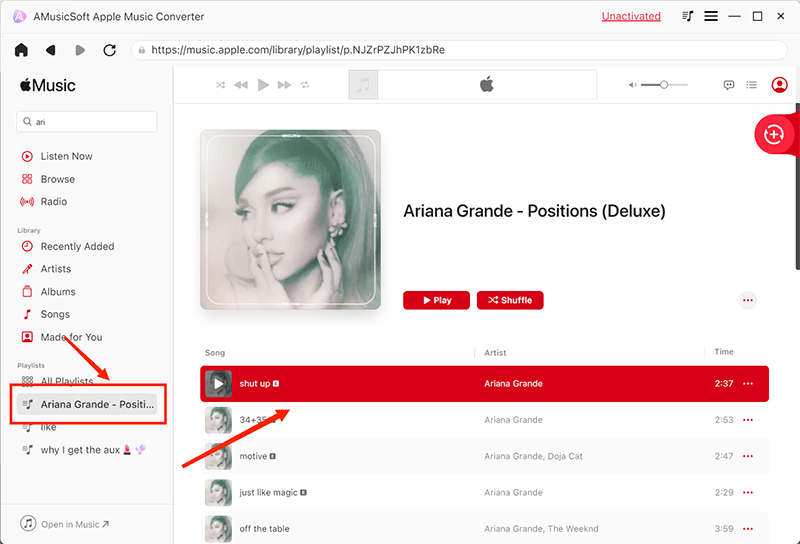
Step 3. To convert iTunes to MP3, once you are done, from the menu, choose MP3 format. You can also choose the output folder for the storage of the converted songs.

Step 4. Now that you are already set, hit the Convert button to have the process started right away.

Wait for a while until the process is done. To save the results, access the Finished section and check for tracks available for download. Now your songs are DRM free which means that you can play DRM-free songs on any device you want.
You may be interested:
Part 3. Summary
The good thing about having a successful conversion of iTunes to MP3 is that you can have the full copy of the songs that you can transfer to any music player for streaming without any restrictions. Authorization through your Apple ID is not needed as well. Plus, even without the Apple Music subscription, you can continue keeping the songs. You can even enjoy them unlimitedly, whenever you want and wherever you are.
On the other hand, if you wish to permanently own the items that you just converted from Apple Music to MP3, I strongly recommend AMusicSoft Apple Music Converter. This tool is very useful given all its features and services offered. With AMusicSoft, you can save a lot of money, because instead of paying for a monthly subscription, you can have the items for free.
People Also Read
- Removing DRM From iTunes Movie For Free
- The Steps On How To Burn Songs From iTunes To CD On PC
- How To Burn CD From iTunes On Windows And Mac
- The Easy Way On How To Burn CD On iTunes
- Can I Remove DRM From iTunes Movies Handbrake?
- How To Remove DRM From iTunes Music
- The Steps To Follow In Doing iTunes Export MP3 Process
Robert Fabry is an ardent blogger, and an enthusiast who is keen about technology, and maybe he can contaminate you by sharing some tips. He also has a passion for music and has written for AMusicSoft on these subjects.