How To Turn Off Explicit On Apple Music (2025 Updated)
If you love Apple Music, you would know that it has one of the largest music libraries these days. And this also means the possibility of having songs with explicit language. This is why it’s very essential for many users to know how to turn off explicit on Apple Music, especially those who have children who often borrow their devices where the Apple Music app is installed. This is also very vital to people who hate listening to any type of explicit language, a way or a choice to turn this option off would be a good opportunity.
This feature can also be turned off individually or as a whole, if you are using or under the Family type subscription. The methods on how to turn off explicit content on Apple Music for every type of device differ. So, if you are interested, we are going to talk about these methods and tools that can aid us to turn off the said option. Let us now get started with the discussion with the topic about the methods on how to turn off explicit on your Apple Music app, below.
Contents Guide Part 1. Turn off Explicit on Apple Music on Your iPod Touch, iPad, or iPhonePart 2. Turn off Explicit on Apple Music on Your Windows PC and Mac ComputerPart 3. What Can You Do to Permanently Get Rid of All the Explicit Contents?Part 4. To Summarize It All
Part 1. Turn off Explicit on Apple Music on Your iPod Touch, iPad, or iPhone
The steps on how to turn off explicit on Apple Music are quite easy. You cannot turn it off by going over the music app, instead, proceed to Settings in order to begin. Let us see the detailed procedure below.
- On your iOS device, open the Settings app.
- Go and choose the option Screen Time, and then go to Content and Privacy Restrictions. You will see a switch which is beside Content and Privacy Restrictions you have to tap it, in order to activate the media restrictions of Apple.
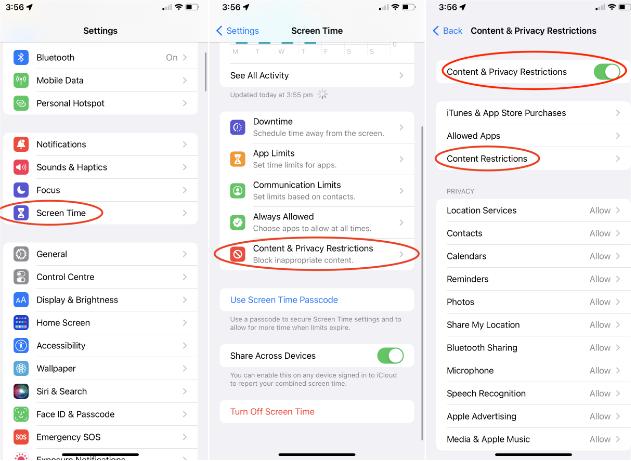
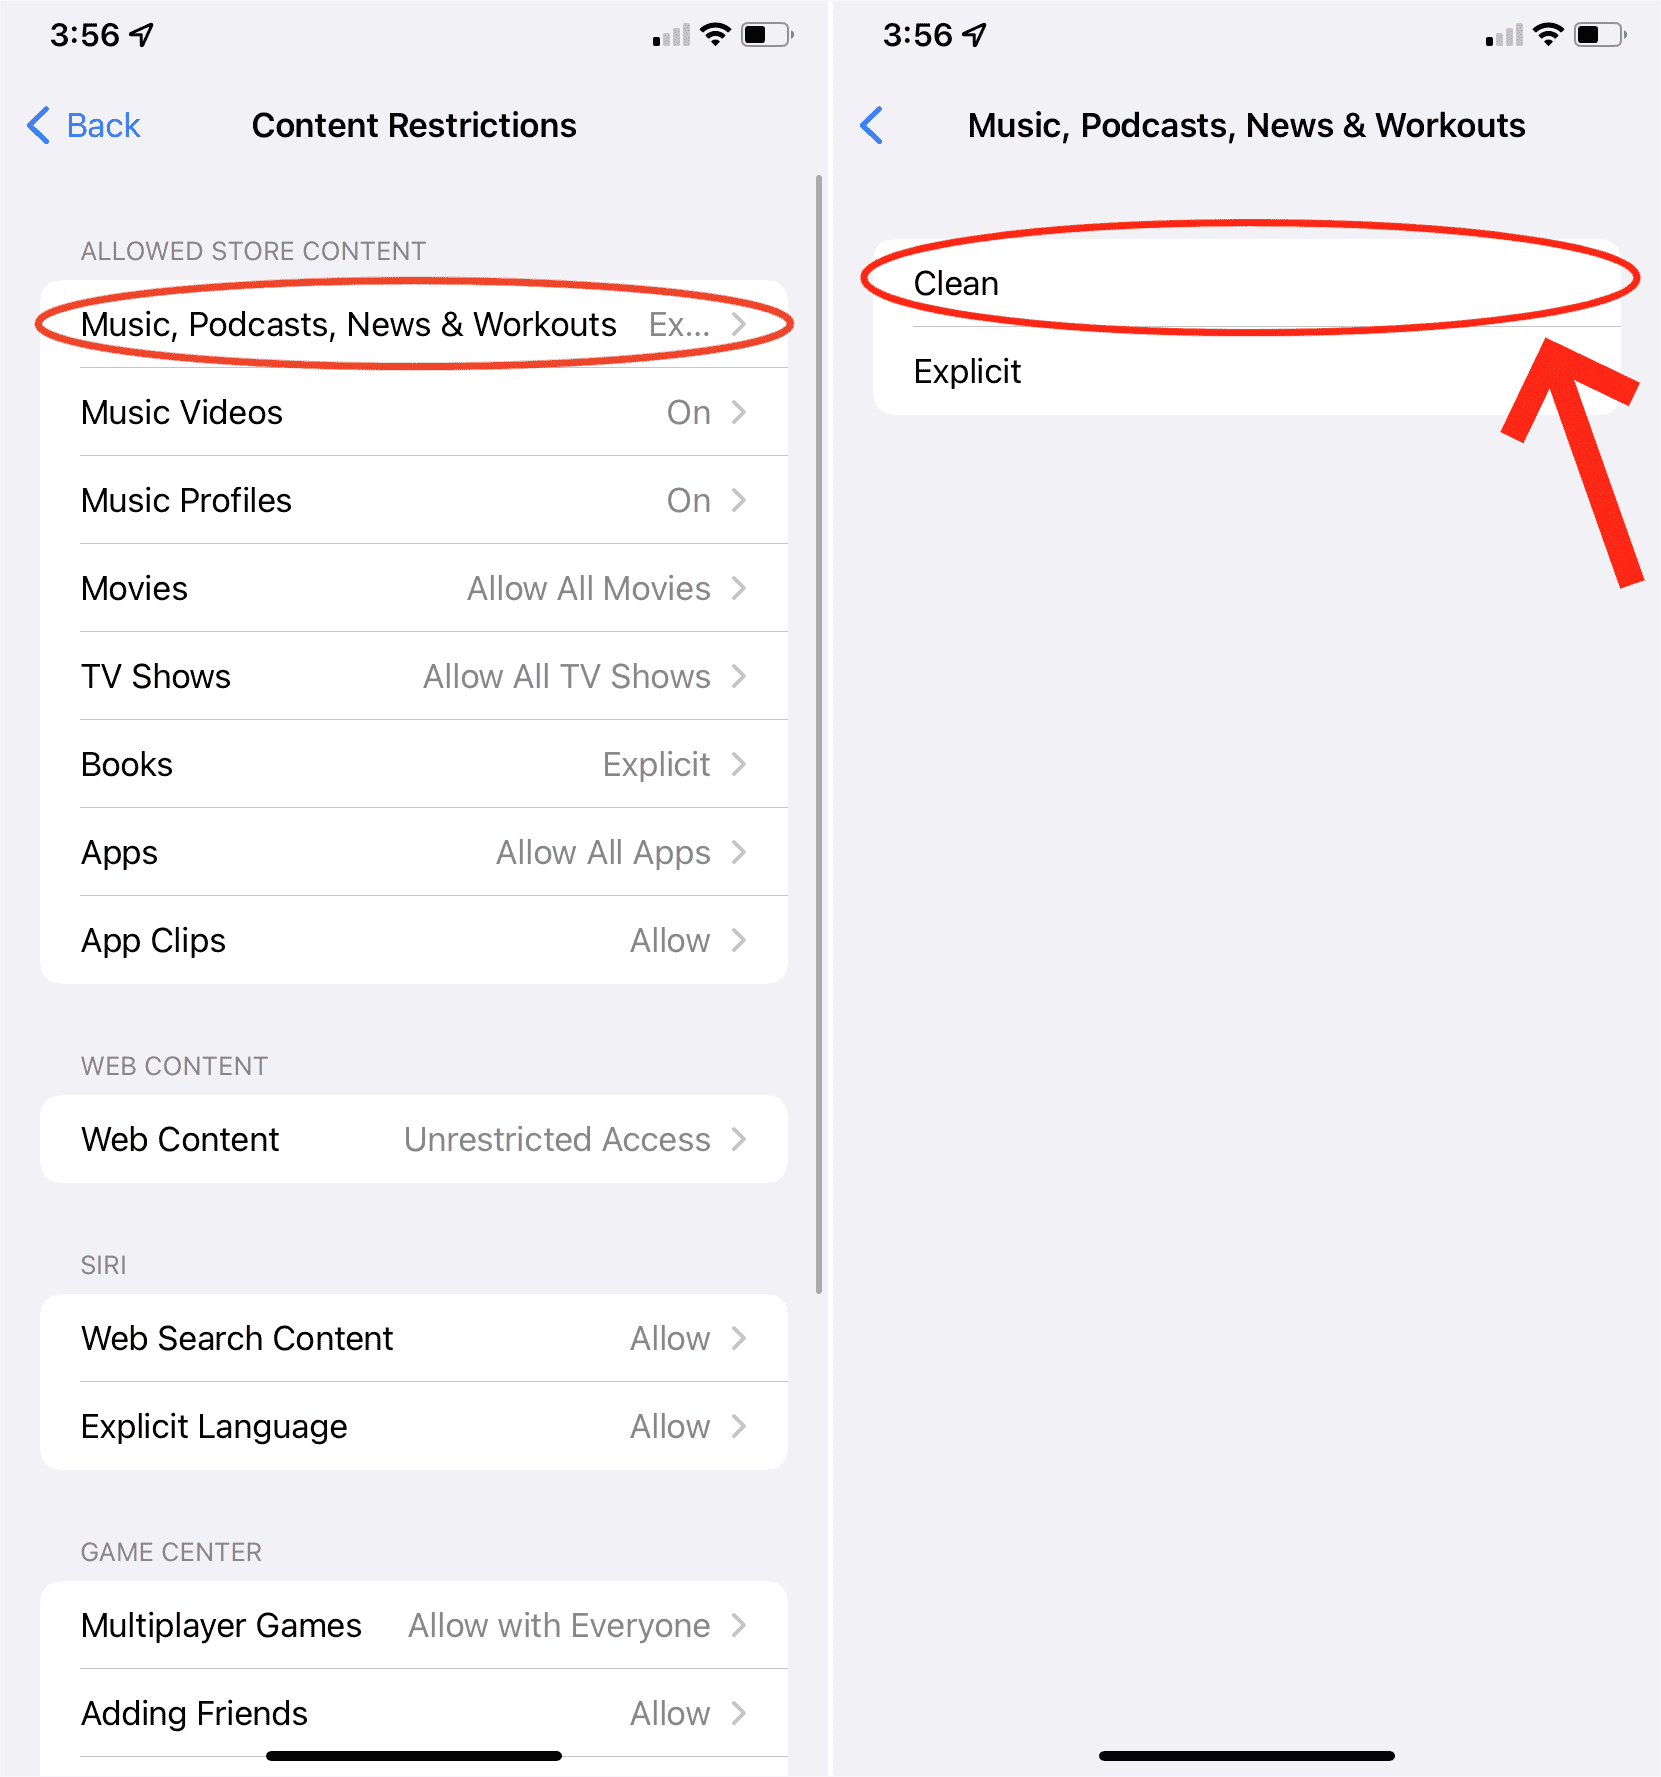
- Go and choose the option Content Restrictions. Then, go and click Music, Podcasts, and News.
- Go and tap the option Clean in order to limit all the podcast episodes, music, and news content to marked safe content for all ages. This option will block any type of media that is marked with the Explicit option.
It is also a good idea to save the settings. To do it, go to Settings, and then proceed to Screen Time, and then go and tap the option Use Screen Time Passcode.
Part 2. Turn off Explicit on Apple Music on Your Windows PC and Mac Computer
For the second part, we will discuss how to turn off explicit on Apple Music on your Mac or Windows computers. Those media that have the tag that says Explicit Tag, can be blocked, using the Music app or the iTunes app on your computers and the good thing is the instructions are identical for both Macbook and Windows computers. Let us have the steps below.
- Open your computer, and then launch the iTunes app.
- Once you have opened either iTunes or Music app, go to the Menu bar, and choose Preferences.
- Then you will have to click the Restrictions tab.
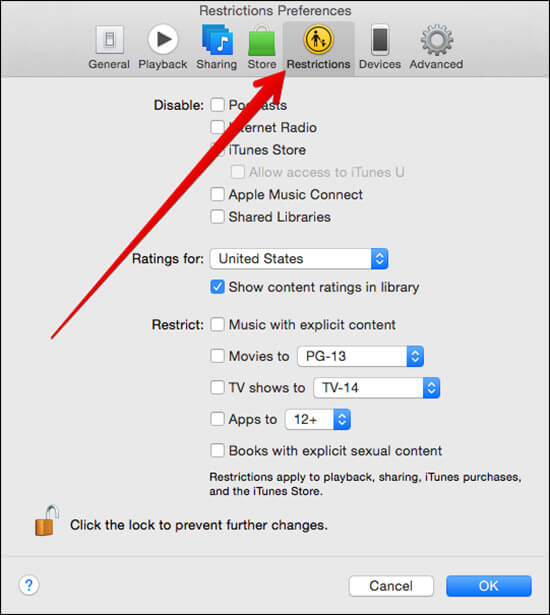
- Then, after tapping Restrict you have to check the box that you will see next to the option Music with explicit content, and then to save all the changes you have to tap the option Ok.
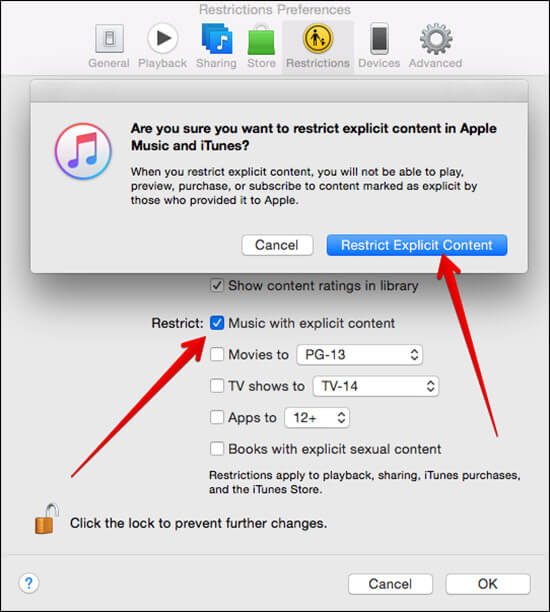
- You are also free to put a check on other boxes to apply the restrictions to all other content like digital books, shows, or movies that have mature content and themes.
- And for the last step, there will be a confirmation box that will pop up. You have to choose the option Restrict Explicit Content.
After you are done, all the explicit albums and songs are now fully blocked. It can also happen that people would get worried that someone might change the settings that you have made, you can select the padlock that you will see on the screen of Restrictions preferences, and of course, you have to keep the passwords from your kids, so they won’t change any setting.
Part 3. What Can You Do to Permanently Get Rid of All the Explicit Contents?
It is truly important to know how to turn off explicit on Apple Music, it is to make sure that there is no way that children can have a hold of the things that they should not know about or listen to. The best way to make sure that such a situation would not happen is to choose a permanent solution to get rid of all the explicit content. We can do it, through the use of many third-party applications or tools.
By downloading all the songs that you love from the Apple Music app, you can now enjoy all the songs that you love without any worry that explicit content may harm you or your children. However, songs from Apple Music are protected by DRM or Digital Rights Management and a professional converter like the AMusicSoft Apple Music Converter can help you deal with it. Can you listen to Apple Music offline? Of course! All of these audio formats can easily be saved and played offline on any device of your choice without any limit. In order to be aware of the features of the AMusicSoft Apple Music Converter, we have the list below.
- You can use the AMusicSoft Apple Music Converter to download music from iTunes and Apple Music for free.
- The DRM or Digital Rights Management can be removed and gotten rid of through the use of the AMusicSoft Apple Music Converter. The said legal restrictions can be removed alongside the process of conversion.
- You can use the AMusicSoft Apple Music Converter to convert all the songs that you love from the Apple Music app to a lot of types that are deemed versatile and can be played using any type of player.
- The AMusicSoft Apple Music Converter can convert your files 16 times faster than basic converters. It can help you save lots of your time which you can use for other activities that you have to do.
- The AMusicSoft Apple Music Converter can make sure that the quality of the original files will remain intact and would not be affected even after the process of conversion.
Let us now see the steps on how to turn off explicit on Apple Music using the AMusicSoft Apple Music Converter. Let us see the steps that we have below.
Step 1. The initial step that you have to do is to download and install the AMusicSoft Apple Music Converter on your computer. Once downloaded, open the tool and then start choosing all the music files that you wanted to convert. The tool will then begin scanning all the files that your personal computer has.

Step 2. Then, you can now create a folder where you will be saving all the music files that you have converted. You also have to assign a name to the folder so you can easily identify it once you need all the songs saved to the said folder. You can use your own preferences in naming the said folder.
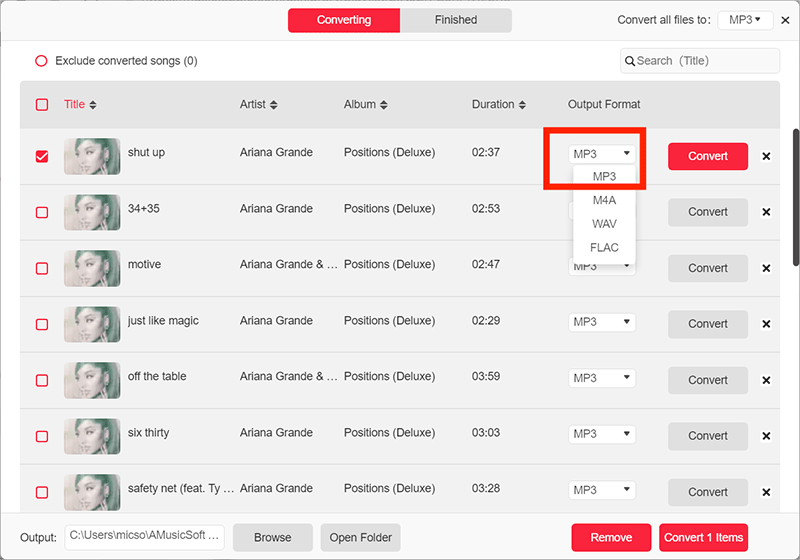
Step 3. For the final step, you have to tap the Convert button and wait for a few minutes until the AMusicSoft Apple Music Converter has completed converting all your files. The length of the process will depend on how many files have you selected for conversion.

Part 4. To Summarize It All
It is truly important to be aware of the ways how to turn off explicit on Apple Music. This way, we could help protect our children from learning things that should be out of their boundaries. We hope that you have learned a lot of things that you can use in the future, and we hope that professional converters like the AMusicSoft Apple Music Converter would also be of huge help as well.
People Also Read
- Why Is iTunes Skipping Songs Before They Finish? (Explained)
- Why Does iTunes Separate Songs From The Same Album [Answer]
- Why Does Apple Music Keep Deleting My Downloads?(Fixed)
- Know About “Do You Have To Pay For Apple Music”
- Two Ways On How To Add Synced Lyrics To Apple Music
- How To Listen To Apple Music Podcasts Easily On Any Device
- Easy Fixes For Apple Music Not Syncing To Mac Issue
- Can You Download Apple Music On PC? – Solved!
Robert Fabry is an ardent blogger, and an enthusiast who is keen about technology, and maybe he can contaminate you by sharing some tips. He also has a passion for music and has written for AMusicSoft on these subjects.