How To Turn Music Into Ringtones On iOS And Android?
Personalized ringtones have become increasingly popular, allowing people to express their individuality and make their phone calls more enjoyable. Turning music into ringtones may seem like a daunting task, but with the right tools and software, it's a straightforward process.
In this article, we'll guide you through the steps on how to turn music into ringtones. We will talk about selecting a song, editing it to create a ringtone, transferring the file to your smartphone, and setting it as your default ringtone. Whether you're an iPhone or Android user, our comprehensive guide will help you create a personalized ringtone that stands out from the crowd.
Contents Guide Part 1. How to Turn Any Song into a Ringtone Step-By-Step?Part 2. How to Grab Your Favorite Songs from Apple Music?Part 3. Conclusion
Part 1. How to Turn Any Song into a Ringtone Step-By-Step?
Step 01. Selecting A Song
If you want to learn how to turn music into ringtones this is the first step. When it comes to selecting a song to turn into a ringtone, there are a few things to keep in mind. Here are some tips to consider:
- Choose a song with a recognizable and memorable melody that will grab your attention when your phone rings.
- Consider the genre of the song and your personal taste. You don’t want a ringtone that will annoy you every time it plays.
- Avoid songs with long intros or outros, as they can make the ringtone too long and potentially annoying.
- Select a song with a steady and consistent tempo. A song that has a lot of changes in tempo may not make for a smooth and enjoyable ringtone.
- Keep in mind the context in which your phone will be ringing. If you need a ringtone for work, consider selecting something more subdued and professional.
In terms of length and structure, a ringtone should ideally be between 20-30 seconds long. This is long enough to showcase the melody and capture attention but short enough to avoid becoming annoying or disruptive. When editing the song to create the ringtone, aim to start and end the file at natural points in the song, such as the beginning or end of a chorus or verse. This will ensure that the ringtone sounds seamless and well-crafted.
Step 02. Editing The Song
Once you've selected a song for your ringtone, the next step on how to turn music into ringtones is to edit the file to create a shorter and more personalized version. There are various software programs and applications available for editing music, including both paid and free options. Here's an introduction to some of the most popular software programs for creating ringtones:
- GarageBand: This is a music creation software developed by Apple, available exclusively for macOS and iOS devices. It’s a powerful tool for editing music and creating customized ringtones.
- Audacity: This is a free, open-source audio editing software available for Windows, macOS, and Linux. It’s a great option for basic audio editing, including creating ringtones.
- Ringtone Maker: This is a free mobile application available for both Android and iOS devices that allows users to create ringtones from their music library.
Here's a step-by-step guide to using GarageBand to create a ringtone:
- Download Apple’s GarageBand for free from the App Store and open it.
- Choose any instrument. We are going to choose Keyboard. Tap Keyboard.
- Tab the Tracks View button. This will open Tracks View.
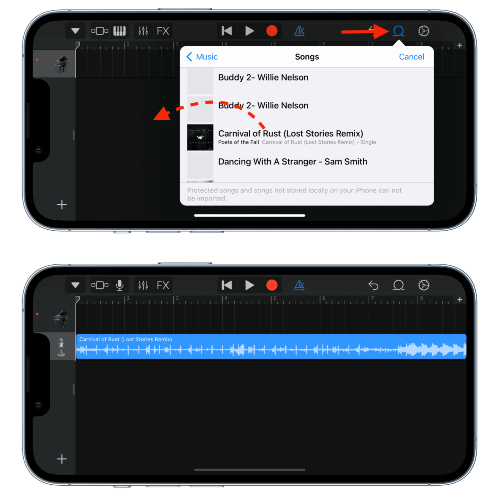
- Tap the Loop Browser icon from the top right. This will open a new menu. Tap Music (or Files) and make sure you can find the song that you want to use as a custom ringtone.
- Drop the file as the second track, because the first track by default is reserved for the instrument you chose.

- Trim the song to the desired length using the editing tools.
- If you know GarageBand, you can edit this further.
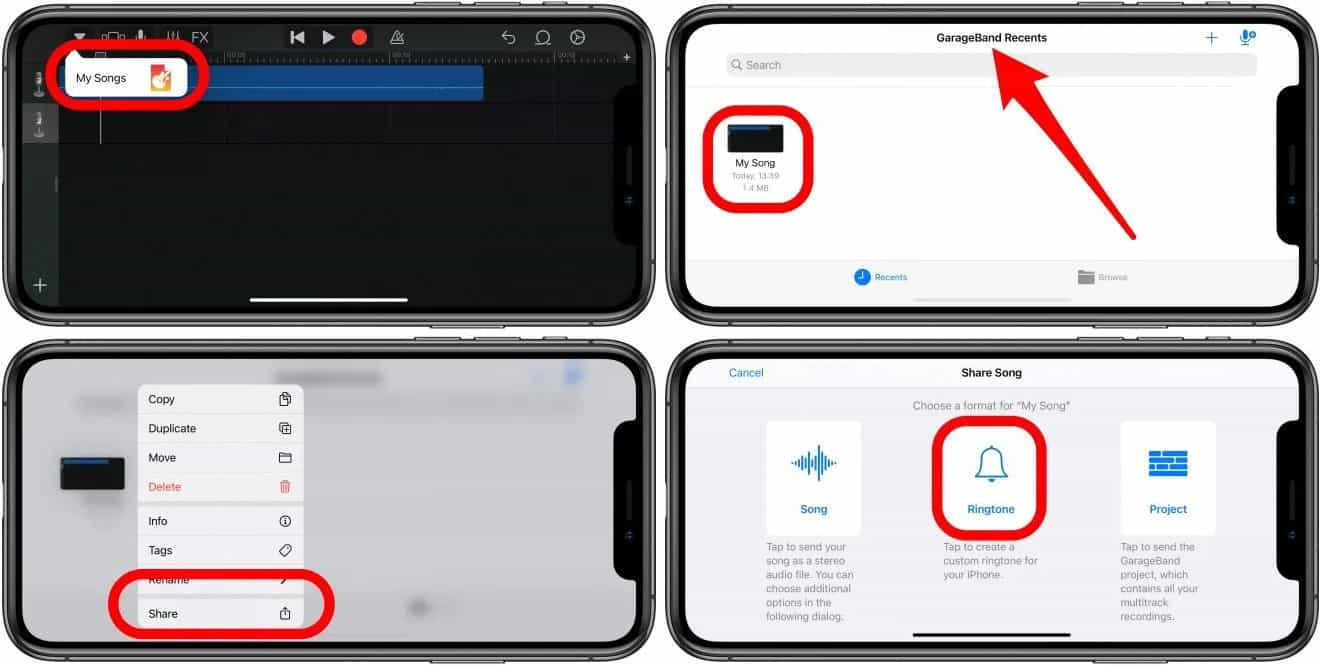
- Once you’re done adjusting your clip, make sure it’s under 40 seconds in length. Now, tap on the downward arrow icon at the top-left corner and select My Songs.
- Press the My Song file and tap Rename. Now, give it any name you want.
- After renaming, press the file again and tap Share.
- And a share menu will appear. Select Ringtone. Then tap Export. It will say Exporting as Ringtone.

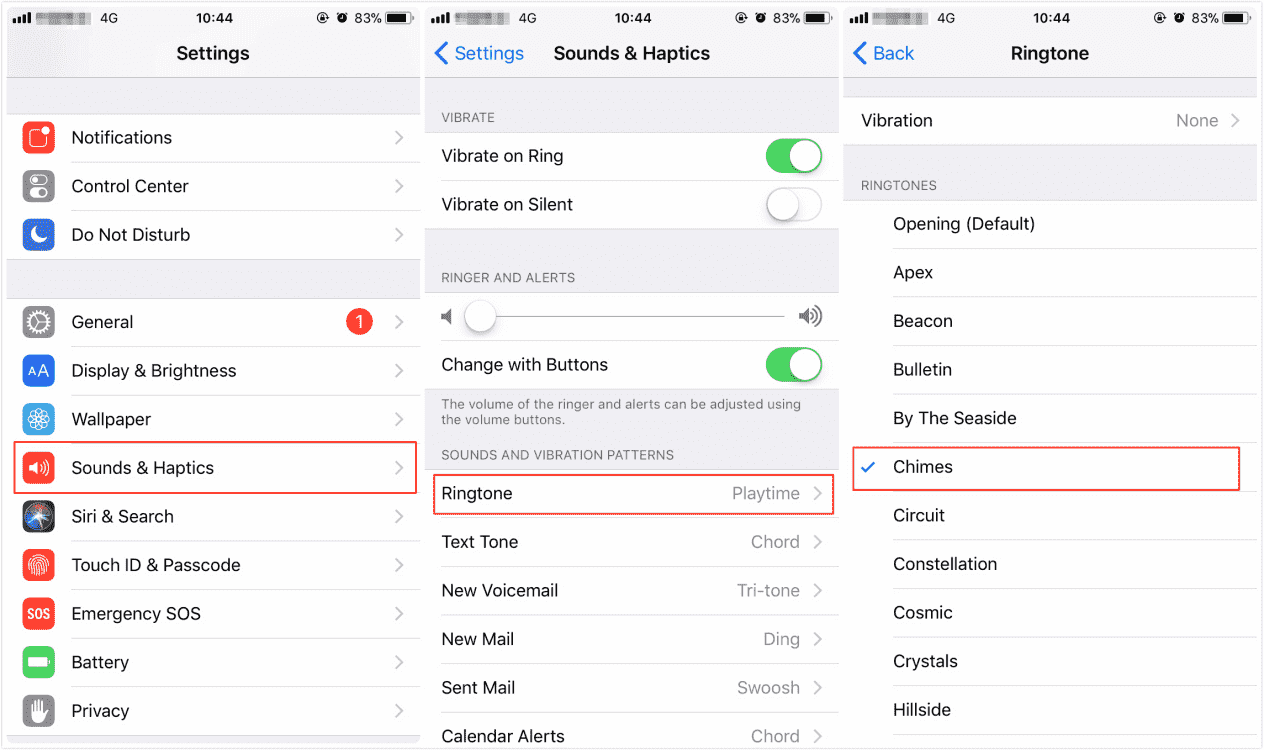
- You are done. You have a new ringtone. On your iPhone, go to Settings > Sounds & Haptics. And you can use your new ringtone by going to the Under Sounds and Vibrations Patterns section.
If you don't have access to GarageBand or prefer an alternative method, there are other options available. Some mobile applications, such as Ringtone Maker, allow you to create ringtones directly on your smartphone. Additionally, some websites offer online ringtone creation tools that allow you to upload and edit your song without the need for software installation.
Step 03. File Transfer
Once you've created your customized ringtone, the next step on how to turn music into ringtones is to transfer the file to your smartphone so you can use it as your ringtone. Here's an overview of how to transfer the ringtone file to a smartphone:
On iPhone
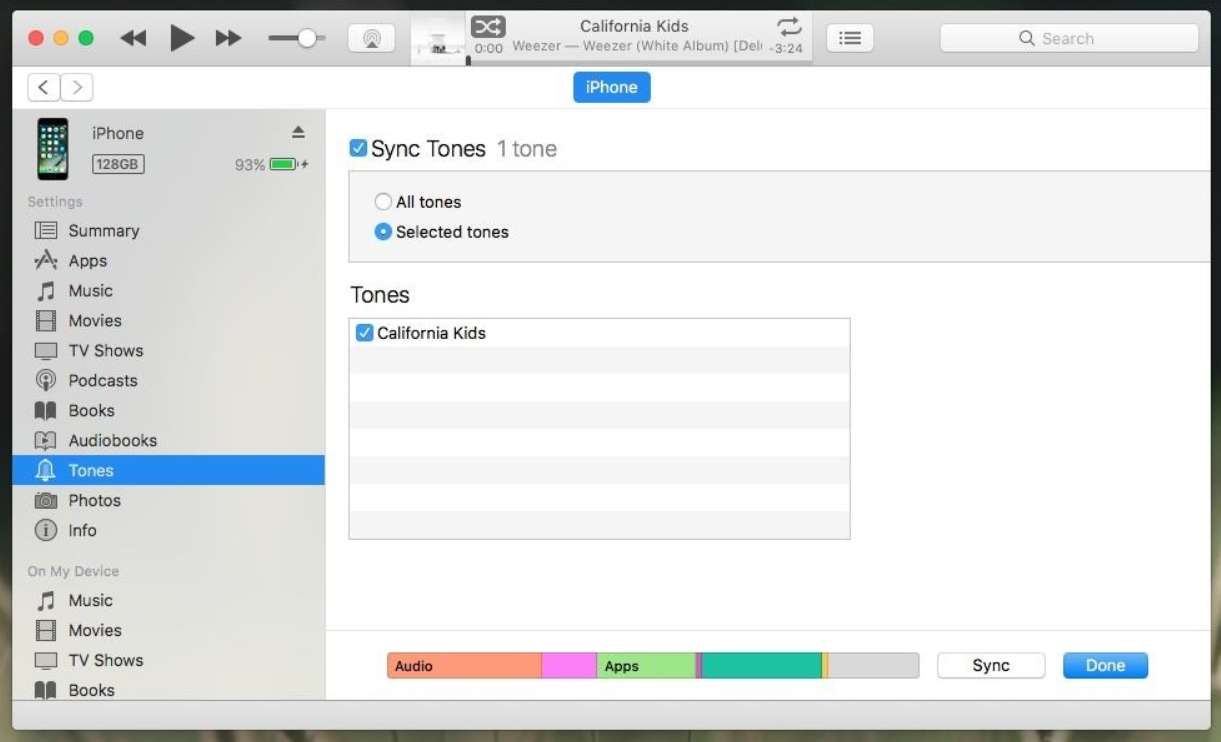
Connect your iPhone to your computer and open iTunes. Drag and drop the ringtone file into the "Tones" section in iTunes. Sync your iPhone with iTunes to transfer the ringtone to your device. You can then set the ringtone as your default or assign it to a specific contact.

On Android
Connect your Android device to your computer using a USB cable. Create a folder called "Ringtones" on your phone's internal storage or SD card. Drag and drop the ringtone file into the "Ringtones" folder. On your Android device, go to "Settings" > "Sounds and vibration" > "Ringtone" to select your new ringtone.
Step 04. Setting The Ringtone
How to turn music into ringtones in the last step? After transferring your newly created ringtone to your smartphone, the final step is to set it as your default ringtone. Here are some instructions for setting the newly created ringtone as the default ringtone on a smartphone:
For iPhones:
- Go to “Settings” > “Sounds & Haptics” > “Ringtone” on your iPhone.
- Scroll down to the “Ringtone” section and select your newly created ringtone.
- Your selected ringtone will now be set as your default ringtone.

For Android Devices:
- Go to "Settings" > "Sounds and vibration" > "Ringtone" on your Android device.
- Select your newly created ringtone from the list of available ringtones.
- Your selected ringtone will now be set as your default ringtone.
Part 2. How to Grab Your Favorite Songs from Apple Music?
How to turn music into ringtones from Apple Music? Apple has revealed that its streaming music service now has 100 million songs. With a large music library on Apple Music, you can explore the music you never knew existed and find your new favorite tune you would never expect. However, if you want to turn your favorite music into ringtones, one of the best tools you can use is third party tools like music converter.
You must be aware already that the music files in the Apple Music library are protected with DRM. This is what Apple does to protect the rights of the artists. So, to use a custom ringtone on your phone, you have to think of a way to remove this protection layer in order to proceed with downloading the music files. To be capable of removing the DRM protection from Apple Music files, you may use AMusicSoft Apple Music Converter.
This powerful software also allows you to download and convert music from Apple Music and iTunes into a variety of formats, including MP3, FLAC, and WAV. Once you've converted your favorite songs, you can use them to create your own custom ringtones. You can also have them transferred to other devices by simply using a USB cable. Meaning to say, with the help of AMusicSoft Apple Music Converter, you will be free to use any device of your choice in streaming the tracks even if the Apple Music app not working on iPhones, Android, or Mac.
Here's how to use AMusicSoft Apple Music Converter to grab your favorite music:
- Download and install AMusicSoft Apple Music Converter on your computer.
- Launch the software and select the music you want to convert.

- Choose the output format for your converted files. You can select MP3, FLAC, or WAV.

- Click the “Convert” button to begin the conversion process. The software will automatically download and convert your selected music.

- Once the conversion is complete, you can transfer the converted music files to your smartphone and use them as ringtones.
With its easy-to-use interface and powerful conversion capabilities, you can create custom ringtones in no time. Whether you're a music lover or just looking for a way to add a personal touch to your smartphone, AMusicSoft Apple Music Converter is the perfect tool for you.
Part 3. Conclusion
We have talked about how to turn music into ringtones. So, in conclusion, creating custom ringtones is a fun and easy way to add a personal touch to your smartphone. By selecting the right song, editing it to the right length and structure, transferring it to your phone, and setting it as your default ringtone, you can turn any song into a ringtone that reflects your personality and style.
While there are many ways to create custom ringtones, one tool that stands out is AMusicSoft Apple Music Converter. This powerful software allows you to download and convert music from Apple Music and iTunes into a variety of formats, making it easy to create your own custom ringtones. With its simple user interface and powerful conversion capabilities, AMusicSoft Apple Music Converter is the perfect tool for anyone who wants to turn their favorite songs into ringtones.
People Also Read
- How To Set A Song As Alarm On iPhone?
- How To Download Whole Library On Apple Music?
- Easy Guide To Solve Family Sharing Album Not Showing Issue
- How To Send Ringtone To iPhone Via Email, AirDrop And iTunes
- Easy Way On How To Get A Refund On iTunes Music
- 4 Reasons Cellular Data Not Working Issue Happens and How To Fix It
- How to Set up Family Sharing iPhone
- Knowing The Basics About Requiem Converter
Robert Fabry is an ardent blogger, and an enthusiast who is keen about technology, and maybe he can contaminate you by sharing some tips. He also has a passion for music and has written for AMusicSoft on these subjects.