How To Export Songs From iTunes To Anywhere (4 Ways)
If you want to know how to back up your favorite music, you'll like the guide on how to export songs from iTunes here. Though iTunes was well-received in its early years as a professional media player and management, more and more users report that many problems arise during the use of iTunes, some users even lose their music or playlists without knowing it.
To keep your favorite music forever, you can try to export or transfer songs from iTunes to computer, USB drive, cloud storage service, or any media device you want. How do I export all my music from iTunes? This tutorial will share all the process of exporting iTunes music and playlists! Read ahead to know more about this.
Contents Guide Part 1. How to Export iTunes Songs to Computer Manually?Part 2. How to Export Unprotected iTunes Songs to MP3?Part 3. How to Export Protected iTunes Songs to MP3?Part 4. How to Export iTunes Songs to XML/Text?Conclusion
Part 1. How to Export iTunes Songs to Computer Manually?
If iTunes shuts down accidentally, you have the completed music backup files to restore if you have a backup on your computer before. What's more, you can transfer your backup music library from the old computer to a new one if you have bought one. That is why we want to export songs from iTunes to a computer. How to export songs from iTunes to computer or hard drive? Here are the steps:
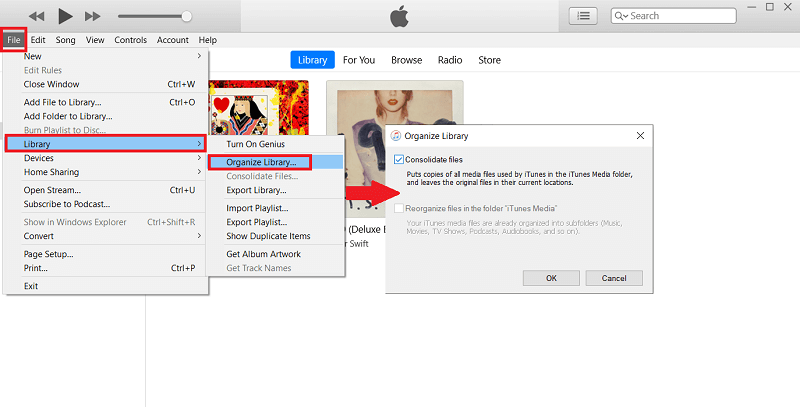
Step 1: You can consolidate all the files in your library first in the iTunes folder to make it easier to move your library to a new computer. So, open iTunes, choose File > Library > Organize Library. Select "Consolidate files."
Step 2: Choose Edit > Preferences, then click Advanced. From the "iTunes Media folder location" section, you can get the folder name where to store your iTunes library. Copy the iTunes folder paths. Quit iTunes.
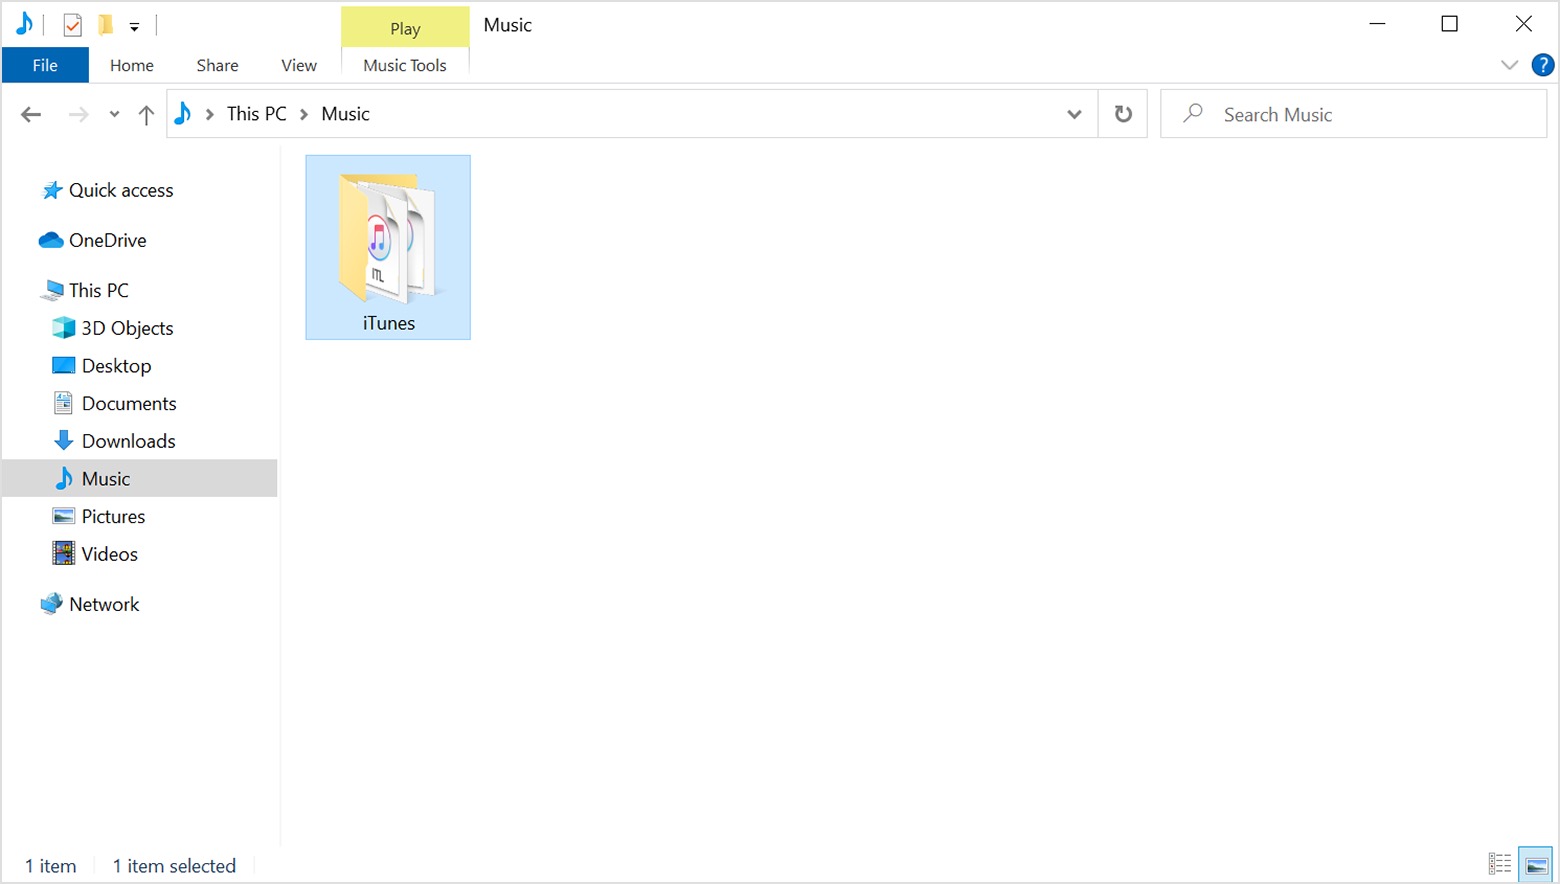
Step 3: Navigate to your iTunes folder in File Explorer (Windows) or Finder (Mac). Drag the iTunes folder from its location to the desktop, another folder or external drive.
Although transferring music from iTunes to your computer is so easy, it seems like a time-consuming method. The exported files might can not be played on mobile devices.
Part 2. How to Export Unprotected iTunes Songs to MP3?
If you want to export music from iTunes to mobile device or other media player to stream on the go, you have to export them to common audio formats like MP3. Fortunately, music purchased from iTunes after 2009 is DRM-free AAC format, so you can convert it to MP3 using its built-in MP3 encoder directly. How to export songs from iTunes to MP3 without digital rights management (DRM)? Here are the steps you can follow.
Step 1: Open the iTunes application on computer used. If you are exporting songs from iTunes on Mac, tap on the iTunes tab placed in the upper left corner, and click Preferences. If you are using Windows instead, select the Edit tab and then select the Preferences option.
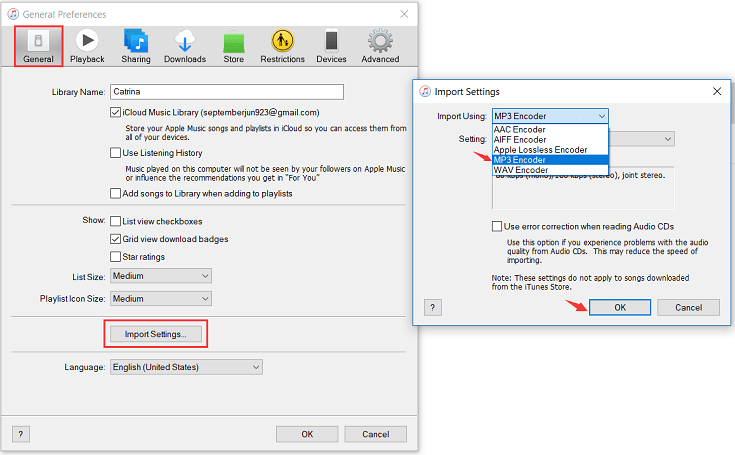
Step 2: After a few minutes, the Preferences window will open and the General tab will be shown. Now click the Import Settings button in the lower right corner. Choose MP3 Encoder since we are tackling how to export iTunes music into MP3 format. Click OK to save the changes that you made.
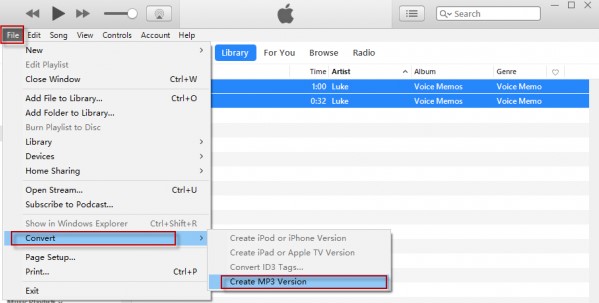
Step 3: Back to your music library, find the song you want to convert to MP3 in iTunes, and single-click it. When the songs you want to convert are highlighted, click the File menu in iTunes. Click Convert (in some older versions of iTunes, look for Create New Version instead). Click Create MP3 Version.
The converted items will appear in your library or saved collection. Now you can move these MP3 songs to anywhere you want.
Part 3. How to Export Protected iTunes Songs to MP3?
You should take note that the procedure tackled above applies only to all iTunes items that are DRM-free. Music, video, TV shows, and audiobooks purchased from iTunes between 2003 and 2009 are still protected by DRM. Plus, iTunes has been replaced by separate apps, and one of them is Apple Music. Apple uses DRM technology called FairPlay to prevent the distribution of all digital content available in Apple Music to cut short piracy. So you can't directly convert Apple Music or iTunes protected files to MP3 using iTunes MP3 encoder.
How to export songs from iTunes and Apple Music DRM-protected files? If you happen to have these DRM-protected audio files instead, you should have FairPlay DRM removal software first to remove DRM from Apple Music and iTunes files. To make this possible, you may try a powerful program called AMusicSoft Apple Music Converter, which would be a big help for the DRM removal process. To add, it can convert your entire music collection into your desired format to MP3, WAV, FLAC, AAC, AC3, and M4A at up to 5x speed. AMusicSoft software will also keep all the music metadata and ID3 tags for the downloads, including the title, artists, Track ID, and album artwork after the conversion is finished. With this information, you can easily manage your collection of music downloads.
Work with Windows and Mac! Get DRM-free MP3 songs from Apple Music and iTunes via AMusicSoft Apple Music Converter! Click the Free Download button to download it on your computer!
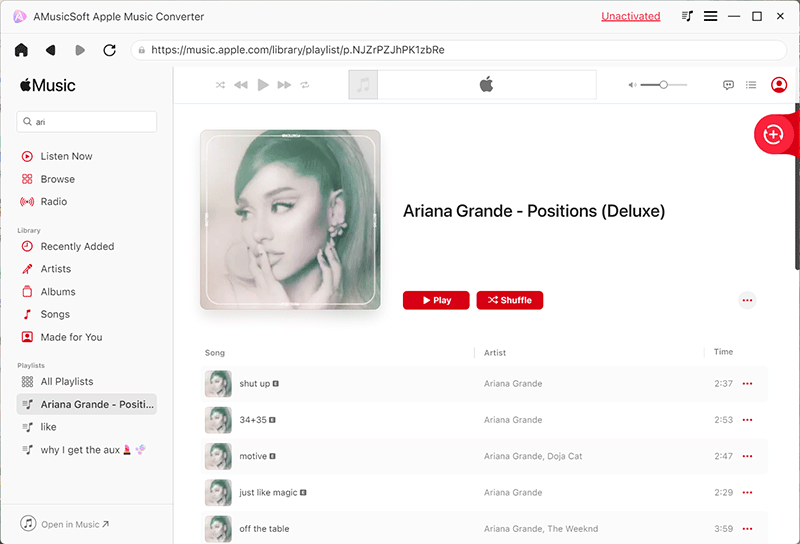
Step 1. Run AMusicSoft Apple Music Converter. The program will instantly scan for your music library. Then you can search for the Apple Music song you want to remove DRM. Simply by dragging them to the "+" button, the software will fetch data from Apple Music.
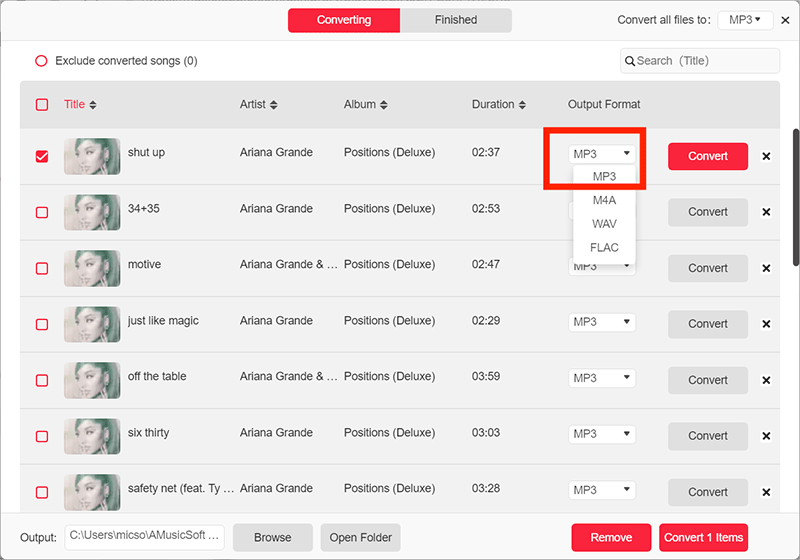
Step 2. How to export songs from iTunes to MP3?, click on the Output Format dropdown to select MP3 as your output format, as well as the folder according to your requirements.
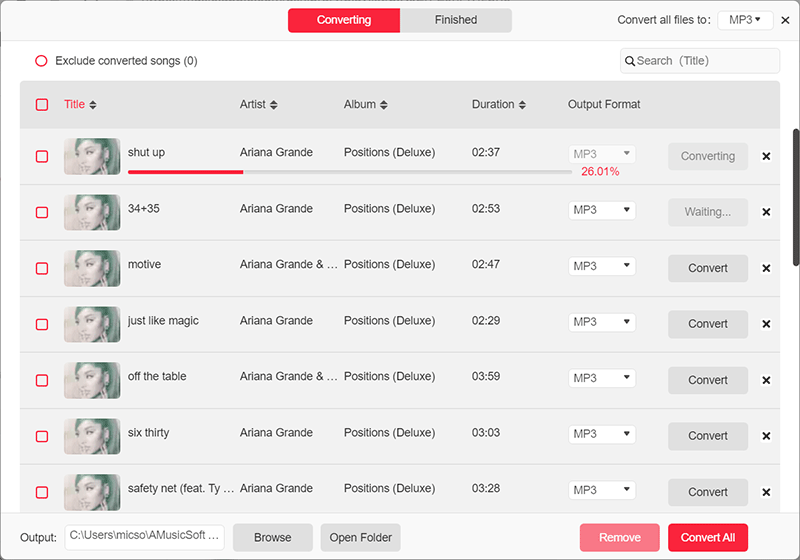
Step 3. If you are done with choosing the right format and the output path, Click on the “Convert” button to start converting. Once it is done, you can now see all your converted songs in the “Finished” section.
Part 4. How to Export iTunes Songs to XML/Text?
You can also use the playlist export features in iTunes to move your playlist to your computer. When you export playlists or transfer song information, the actual songs or videos aren’t included, just the information about them or the playlist. How to export songs from iTunes to XML or Text files? Follow the steps below:
Step 1. Select the playlist in iTunes that you want to export. Click the "File" (Windows) or "iTunes" (Mac) menu.
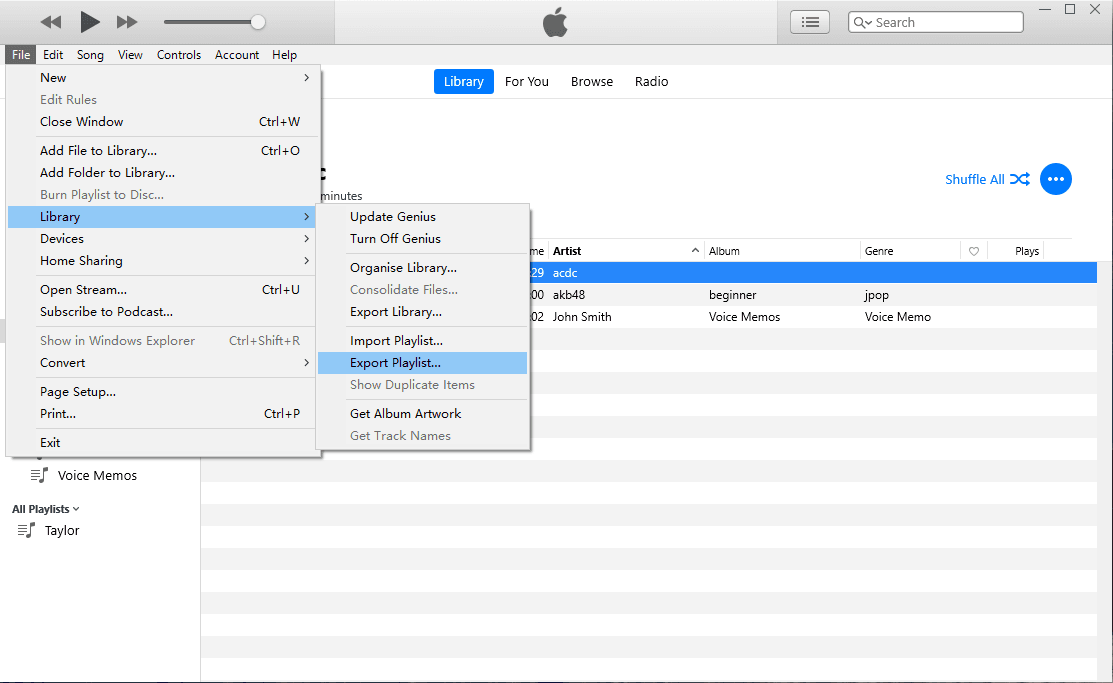
Step 2. Select "Library" > "Export Playlist." This will open File Explorer or Finder, you can choose the location to save the file.
Step 3. Then choose XML from the Format pop-up menu. If you want to transfer media information into other applications, choose Text files. You can change the file name to whatever you'd like before saving it to your computer. Click Save. The XML or Text iTunes files will be saved on your computer.
Conclusion
From the above content, we have given the exact steps about how to export songs from iTunes and Apple Music. Hope the guide can help you back up your favorite music forever with ease. And we also recommend AMusicSoft Apple Music Converter to download DRM-free music in any audio format you like. It’s free software, we advise trying it out for yourself anyway with its free trial version available on both Mac and Windows!
People Also Read
- The Steps To Follow In Doing iTunes Export MP3 Process
- Importing Songs To GarageBand -The Proper Way To Do
- Ultimate Guide To Import iTunes Library To MediaMonkey
- iTunes Export To WAV – The Ultimate Guide
- Easiest Methods To Export iTunes Playlist To Spotify
- Top Methods To Export iTunes Playlist To Excel
Robert Fabry is an ardent blogger, and an enthusiast who is keen about technology, and maybe he can contaminate you by sharing some tips. He also has a passion for music and has written for AMusicSoft on these subjects.