How To Delete Songs On iTunes On iPad, Desktop Or Mobile
There are times when errors on the iTunes application constantly appears on your device used. Although this can be caused by multiple possible factors, one way to fix it is through deleting some items on your music collection. This is very advisable especially if you have lots of saved tracks on your device and some are not being used often.
The discussion below will guide you about the things that you must keep in mind about how to delete songs on iTunes on iPad, iPhone, Mac and Windows computer. The steps are quite similar, so, you can use them as reference on other types of devices as well.
Contents Guide Part 1. How to Delete iTunes Songs on Your iPhone, iPad, iPod Touch?Part 2. How to Delete iTunes Songs on Mac and PC?Part 3. How to Get the Best Experience in Apple Music?Part 4. Summary
Part 1. How to Delete iTunes Songs on Your iPhone, iPad, iPod Touch?
When Apple released macOS Catalina in the fall of 2019, it also quietly closed the book on iTunes. If your Mac runs Catalina or any later version of macOS, this music management software is no more. The good news is that does not mean your library is gone. The Apple Music app is where you can find all of your music, including music that you imported into iTunes, purchased from the iTunes Store, and playlists and smart playlists that you created in iTunes.
To free up some space on your iOS device, you may consider deleting those iTunes tracks that you’ve stopped playing for quite some time. To do such procedure, follow the detailed procedure below about how to delete songs on iTunes on iPad, iPhone and iPod Touch.
- Start with launching the Apple Music app on your iOS device and then navigate to the Library or Playlists section to browse your current song list.
- From here, choose and select the item that you wish to be removed from your collection.
- Touch and hold the item, then tap Remove.
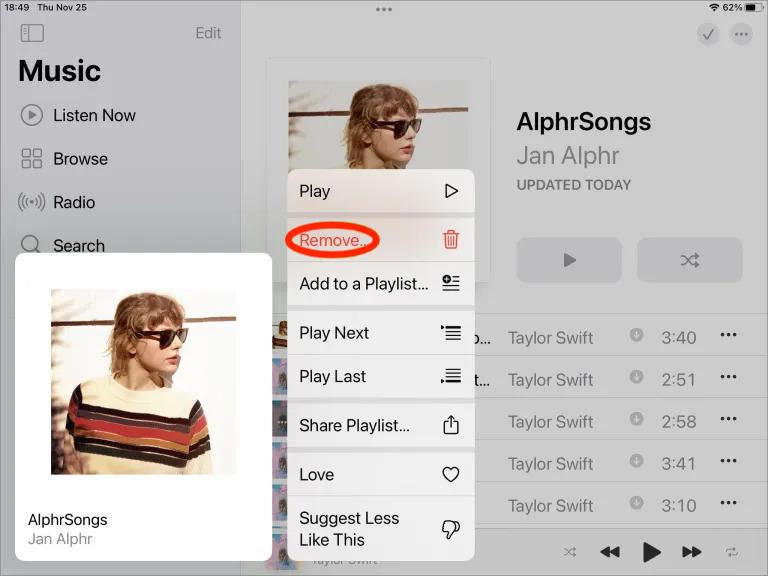
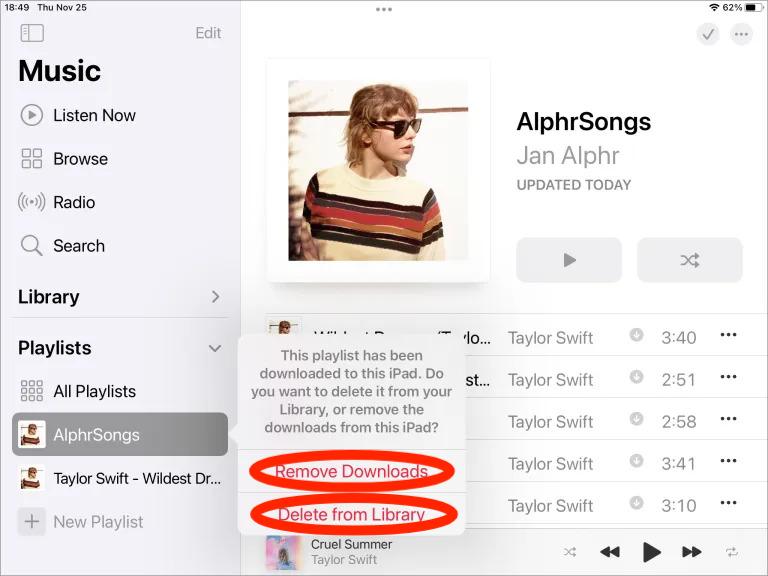
When it comes to finding the Delete option, with regards to the process of how to delete songs on iTunes on iPad and other iOS devices, there might be a different case for two options. Delete from Library removes the downloaded file (if it was downloaded in the first place) and also removes that song from your Apple Music profile. So, once the option is clicked, the item will be deleted from your iTunes library or iCloud Music library if enabled. This will also be the case on all connected and synced devices. Remember that once the item gets deleted from your library, you will no longer be able to bring it back.
On the other hand, Remove Download only deletes the downloaded file from that specific device. The copies will still remain in your iCloud Music library. This means that the deleted song on your computer will still be seen on other devices utilizing the same music library. This option gives the opportunity to re-download the removed items again, but exclusively for users who utilized the iCloud Music library or had the items purchased.
Part 2. How to Delete iTunes Songs on Mac and PC?
Previously, we’ve tackled the complete procedure of how to delete iTunes songs on iOS devices as well as the different cases that users may encounter as they do the procedure. Another place to access the iTunes app is your computer. So, in addition to your learnings about how to delete songs on iTunes on iPad, here is how to do it on your Mac or PC.
On Windows:
- Open the iTunes app on your used computer.
- At the upper left corner of your screen, there is a Music button which you have to click and then follow it with the selection of the My Music tab.
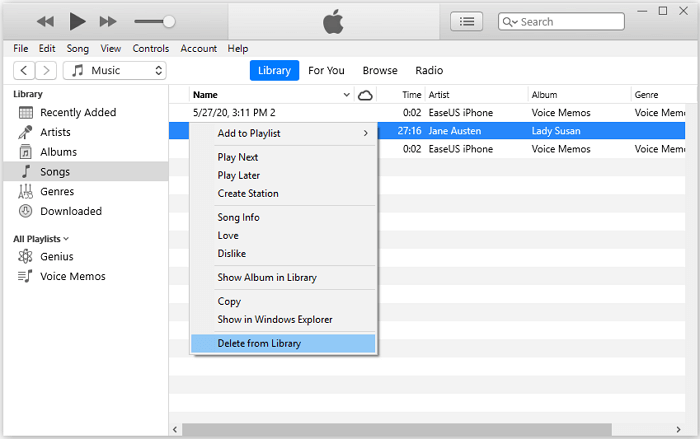
- From the displayed list of songs, select the items that you want to delete.
- Once the chosen music is selected, do a right click on it and then hit Delete from Library option from the menu list displayed.
On Mac:
- Open the Music app and click on Albums, Artists, or Songs under the Library section of the sidebar.
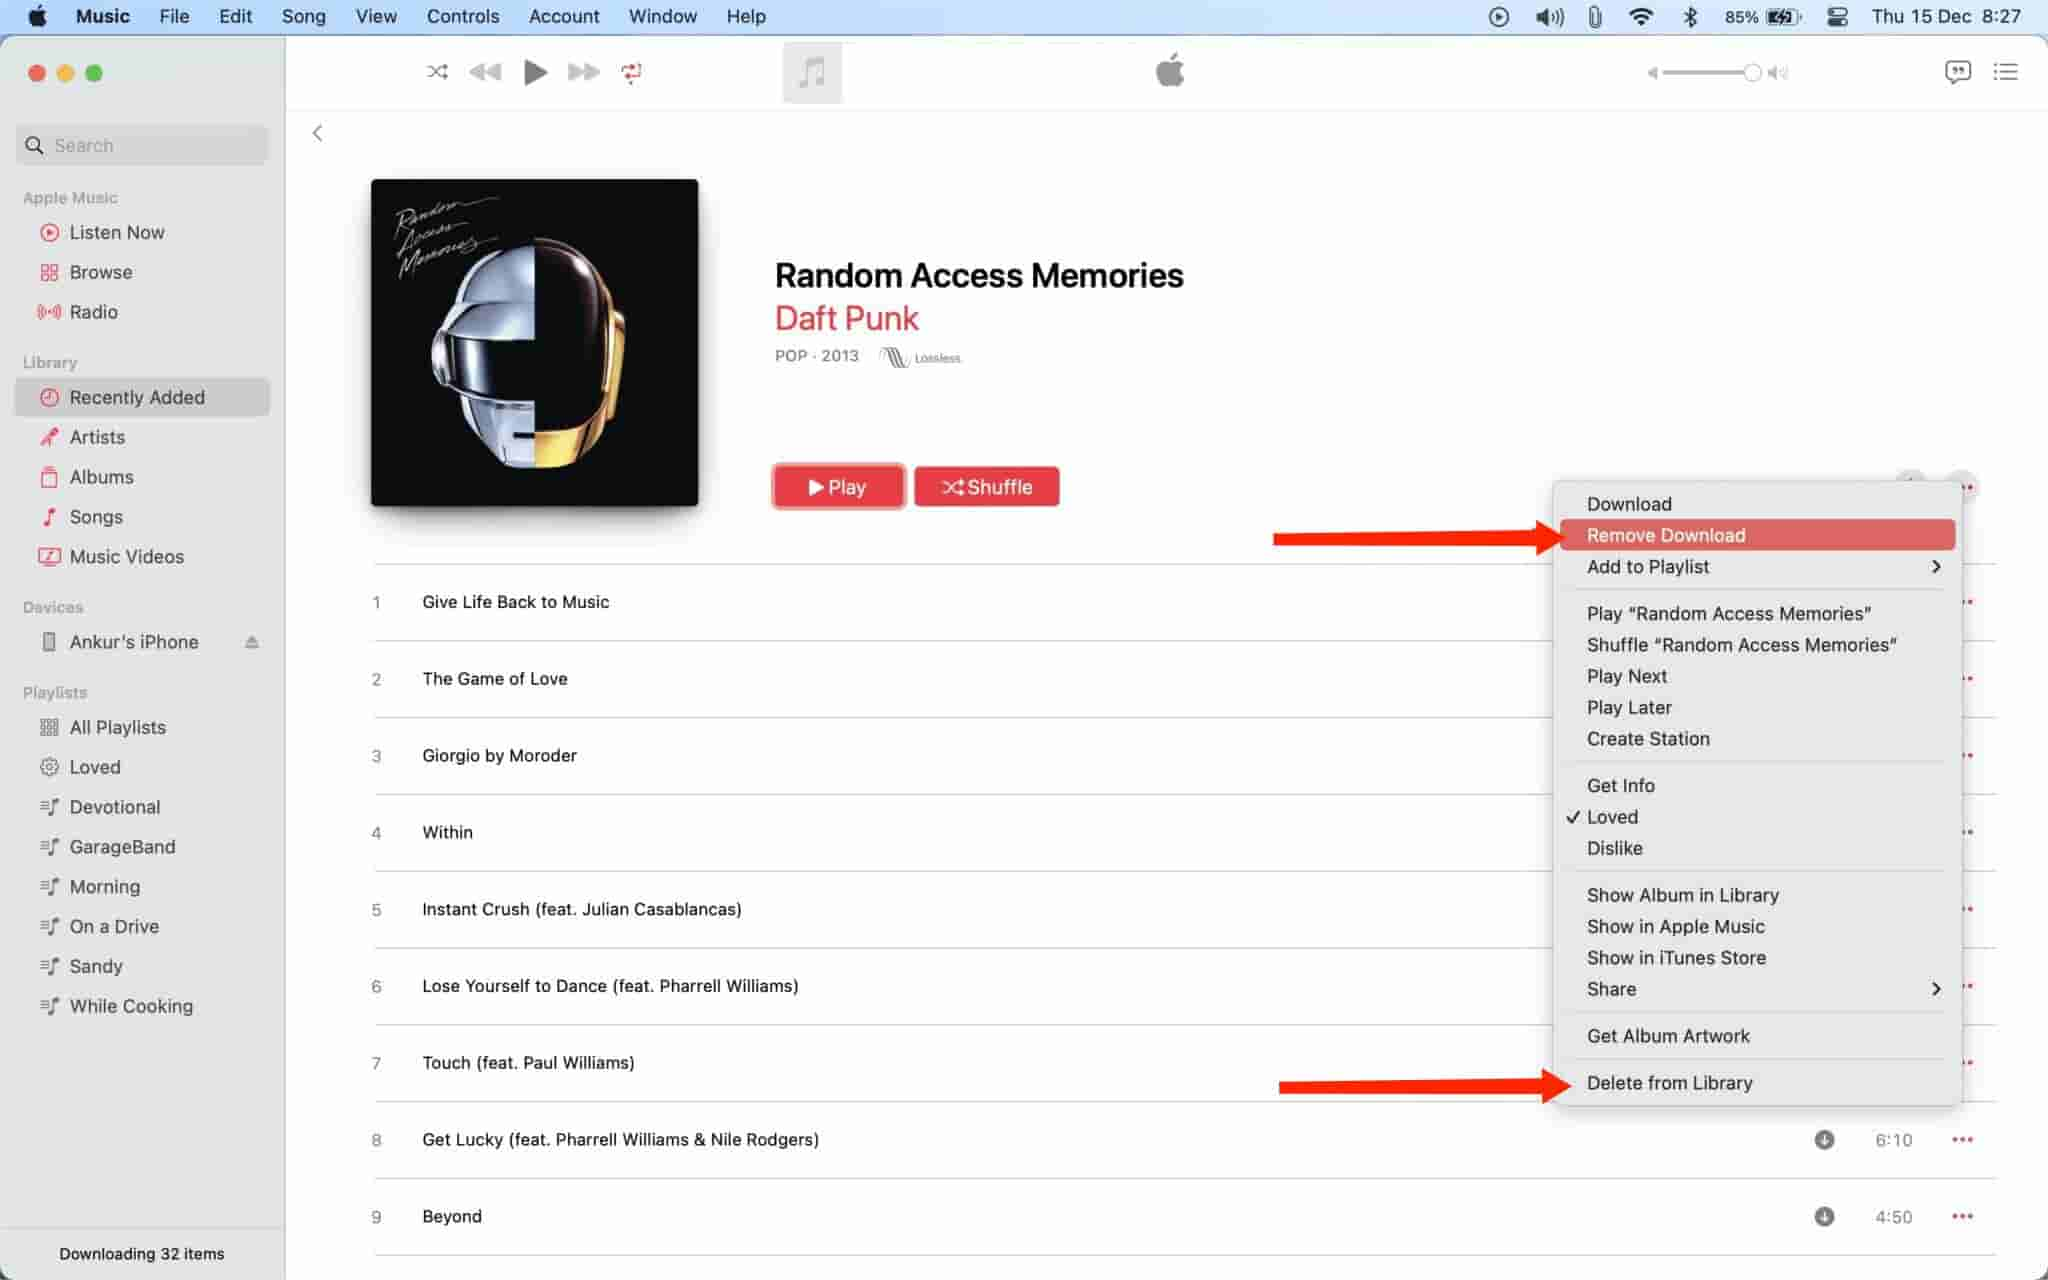
- Now press right-clicks (or tap on the three-dot icon) on any album, artist, or song’s name, which reveals a menu.
- Choose Remove Download or Delete from Library.
Note:
- Remove Download only deletes the downloaded file from that specific device. The copies will still remain on your iCloud Music library. This means that the deleted song on your computer will still be seen on other devices utilizing the same music library.
- Delete from Library removes the downloaded file (if it was downloaded in the first place) and also removes that song from your Apple Music profile. As a result, the song disappears from all your iPhones, iPads, Mac, Android phone, or any device where you have signed in to Apple Music.
Part 3. How to Get the Best Experience in Apple Music?
Now you know how to delete songs on iTunes on iPad, iPhone, Mac and Windows. Actually, it's equally important to know how to manage files, including music. Although deleting iTunes music is easy to complete, music transfer is difficult to finish.
Apple Music is a very popular music streaming service. People get a subscription here to experience the complete set of features offered in the platform. The only thing here that you should mind is that the subscription may be a little pricey, especially if maintained every month. But you do not have to worry if you do not have a subscription, to help you get a better music experience, we recommend you try the music convert software - AMusicSoft Apple Music Converter.
Let me introduce the tool of AMusicSoft Apple Music Converter. This is one of the best tools that can keep your copies of your favorite Apple Music tracks. It can also effortlessly remove the DRM protection from iTunes music files or Apple Music allowing the related processes to proceed. It comes with a conversion feature, which will let you have the formats of MP3, WAV, AAC, FLAC, AC3 and M4A. With the help of AMusicSoft, you can also play your Apple Music song on Roku TV or other devices besides Alexa.
A 16x working speed, which will make the procedure faster to finish and the assurance that you will have a perfect audio quality of the resulting tracks. You will also love the simple interface of AMusicSoft which you’ll surely find very easy to manage. We will show the procedure of how to play iTunes or Apple Music songs for free with AMusicSoft Apple Music Converter.
STEP 1: Go to the official website of AMusicSoft and download the Apple Music Converter application.
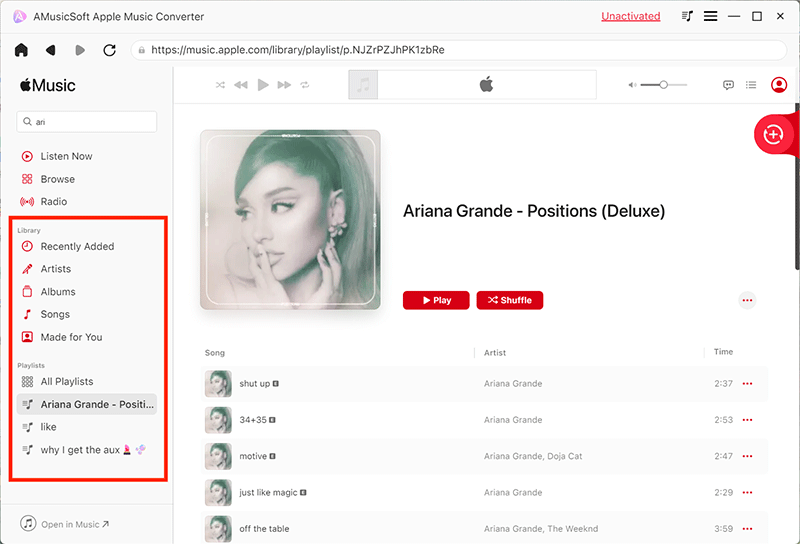
STEP 2: Then, add all the songs you want by ticking on the mini box before each song title you want.
STEP 3: Choose an output format to use and a destination folder to save the converted files.
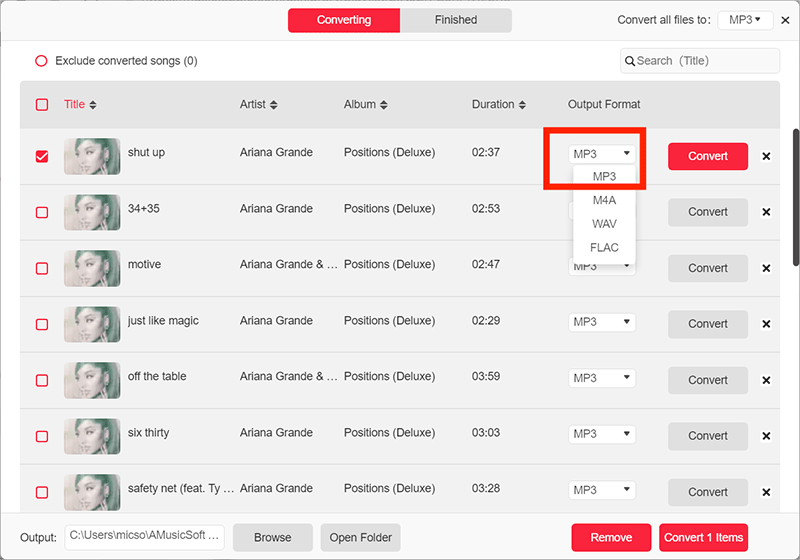
STEP 4: Tap the Convert button and get started with the conversion process.

STEP 5: Navigate to the Converted tab above and check the progress of the songs you selected for conversion.
Part 4. Summary
This post did not only focus on how to delete songs on iTunes on iPad but also tackled the steps to follow if done on other devices such as on Windows and iOS. For easier execution of a procedure, just follow the step-by-step guide above and be able to proceed with the process of how to delete iTunes songs on iPad quickly. On the other hand, if your aim is to experience the best Apple Music service, consider utilizing AMusicSoft Apple Music Converter. This is indeed the best tool for downloading tracks.
People Also Read
- App Store Stuck On Loading? Here’s How To Fix It
- How To Convert Public Spotify Playlist To Apple Music
- How To Get Rid Of iPhone Not Playing: Things To Know
- What Is iTunes Store Audio Format And How To Play?
- Best Tips On How To Make Apple Music Shuffle Better
- How To Play Windows Media On Mac [Best Three Solutions]
- The Complete Guide On How To Buy A Song On iTunes
- Most Effective Ways To Apple Music Songs Greyed Out Error
Robert Fabry is an ardent blogger, and an enthusiast who is keen about technology, and maybe he can contaminate you by sharing some tips. He also has a passion for music and has written for AMusicSoft on these subjects.