Top Three Methods On How To Add Music To Google Slides
A slideshow presentation is one of the most effective ways to introduce your ideas. This can accommodate all sorts of things like business presentations, school activities, product illustrations, and more. Google Slides is very popular when it comes to such ideas and a lot of people are trying to learn how to utilize it perfectly. One way to do that is by trying the process of how to add music to Google Slides. In this post, we will tackle the best methods on how to add music to make your presentation more attractive and catchier.
Contents Guide Part 1. Things to Know About Adding Music to Google SlidesPart 2. How to Add Music to Your Google Slides Presentation?Part 3. Download the Music to Use in Google SlidesPart 4. Conclusion
Part 1. Things to Know About Adding Music to Google Slides
Before doing the process about how to add music to Google Slides, there are things that you must consider and prepare in advance.
- First, a Google account is needed. You have to make sure that your account is active. If you do not have it yet, you can sign up for free in the Google Account page.
- Second thing you need is the Google Drive account. This is very essential for the procedure on adding music to Google Slides, since this will serve as the location of the slides that you will create and also the music files that you’ll add into the slides. Just like in the Google account, there is also a free sign up for Google Drive account in its official page.
Part 2. How to Add Music to Your Google Slides Presentation?
After preparing both your Google account and Google Drive account, you may now easily proceed with adding music to Google Slides procedure. Shared below are some of the methods introduced by Google where you can freely choose whichever is the easiest and the fastest to do.
Add Music by Inserting Audio
Inserting an audio file to Google Slides is one of the simplest ways in accomplishing the process of how to add music to Google Slides. If you wish to utilize the said method, follow the list of steps below.
- Take note that in order for Google Slides to recognize or read the audio file, it must be in the formats of .mp4 or .wav. There is no problem if you already have these audio formats. All you have to do is to upload them into your Google Drive. To do that, go to your account and then select the File upload button.
- After doing so, launch Google Slides and then open the presentation that you wish to modify. If you do not have one yet and you are planning to just start on creating one, tap the plus button which is equivalent to a new presentation.
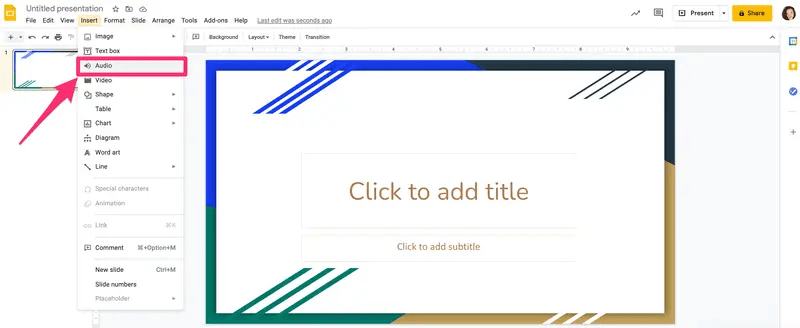
- As you open the presentation, you will see the list of tabs from the menu bar. Among them, choose the Insert tab. From the next menu shown, click the Audio option.
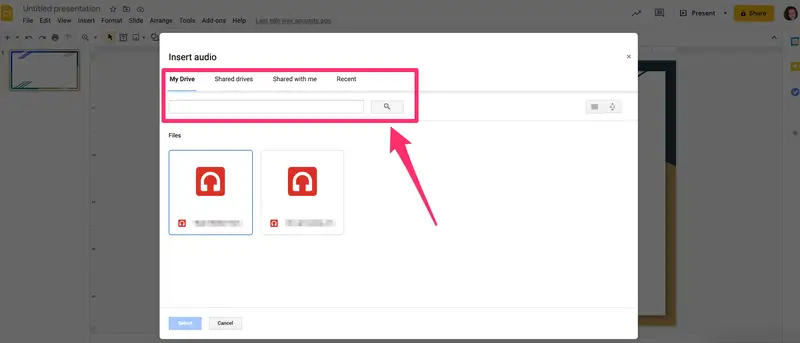
- A few seconds after, the potential audio files that you may add onto your presentation will be displayed. These are the audio files saved on your Drive account. Choose and select your desired audio file to proceed. To easily locate the Select button, this is originally placed at the lower left part of your screen.
- Wait for a few minutes until the audio file chosen is completely added on your Google Slide presentation.
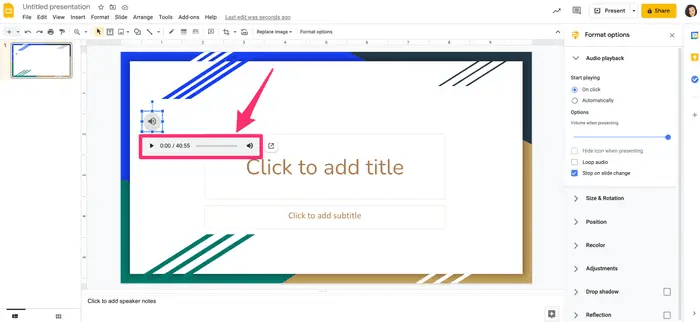
- After you insert audio into your Slides presentation, you will see a little speaker-shaped icon appear on your slide. You can play the audio by clicking on the speaker icon. You can change the placement of the speaker icon by dragging it to a different position on the page.
Add Music by Linking A YouTube Video
In addition to inserting audio files, to proceed with the process of how to add music to Google Slides, you may also consider linking a YouTube video on your presentation. Actually, before the Insert Audio feature, the use of YouTube videos has been used long ago. This is one of the original methods used by users before since there are some who do not want to join the hassle of separately uploading audio files on Google Drive.
- To get started, open the YouTube app on your device, or you can just type it on your browser. Then search for the video that you want to use in your presentation. Make sure to have it opened while doing the next steps.
- Select the presentation where you’ll add the YouTube video or create a new one if you are just starting on your project.
- Right after that, click the Insert tab from the menu bar at the top and then choose the Video option.
- Head to the separate browser where you had the YouTube video opened and then copy its link.
- Go back to the Google Slides window wherein you have to select “By URL”. This is located just beside Search and Google Drive.
- In the provided area, paste the copied link of the video. If you accidentally had the video closed, you may utilize the Search feature located at the end part of the search bar by simply typing the video you want.
- Once done, hit the Select button at the bottom left corner of the screen.
- After a while, the YouTube video will then be placed on your presentation. You may adjust the size of the video displayed as well as its location in the slide.
Keep in mind that since you had a whole video added, the entire video clip will be played while playing the presentation. So, if you do not wish to show the video and you want to keep it hidden so that the attention would be on the audio alone, make sure to display it in the smallest way possible.
Add Music by Using Shareable Links
Using shareable links is also a widely used method in relation to how to add music to Google Slides. Some of its initial steps are the same with the previously tackled, but this is a bit different approach in adding audios onto your slide. Check out the steps below.
- You desired audio file must be uploaded on your Google Drive account in advance. To do that, just open your Drive account and then select the File upload option to proceed with adding the file.
- Right after that, launch the Google Slide presentation you’ll modify and then select the Insert tab from the menu bar.
- From the drop-down menu, select the Text box option. Then properly place the text box on your slide.
- On the text box inserted, do a right click and choose the Link option.
- On a separate tab, open your Drive account and then go to your audio file library to select the file to add. Once seen, right click on the audio and hit the Share button.
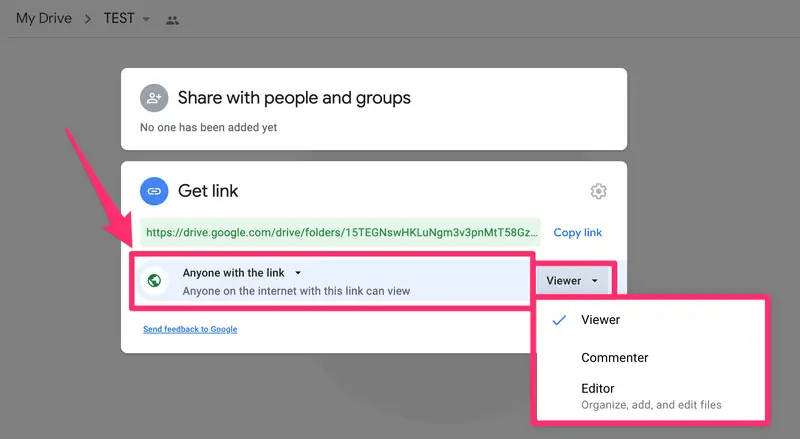
- Allow access to anyone with the link to remove restrictions on the use of this file. This gives access to the audio files to your Google Slides viewers.
- After that, copy the link and then go back to the Google Slide tab and paste the copied link from your Drive.
- Right next to the Link box is the Apply button that needs to be clicked to completely add the audio.
- To play the audio file added, just tap on the text box inserted.
Part 3. Download the Music to Use in Google Slides
In the discussion above, you have learned about the top methods to try when doing the process of how to add music to Google Slides. These methods are the best to utilize especially if you already have a music in mind or if you already have them prepared on your Drive. But what if you want to use music files from Apple Music but Google Slides might fail on recognizing it? How can you download Apple Music songs into the supported formats?
To get rid of such issues, you may use AMusicSoft Apple Music Converter. This tool is composed of features that will surely be helpful in adding music to Google Slides. Not only will you add audio to Google Slides through the help of Amusicsoft, but you can also add music to Capcut, GoPro studio, and more video editing software to make your video fun. To know about them in detail, let us have the features listed one by one.
What Are the Features of Amusicsoft Apple Music Converter?
- AMusicSoft is capable of download and conversion of Apple Music files into the formats of MP3, WAV, AAC, FLAC, AC3 and M4A.
- It can remove the DRM from the songs making them open for any other procedures.
- It has a working speed of 16 time faster assuring every process to end shortly.
- Can produce high-quality audio results.
- Can keep significant details of songs such as ID tags and Metadata info.
- Supports the transferring of converted audio files from one device to another which is equivalent to streaming them on multiple devices.
How to Use AMusicSoft Apple Music Converter?
Another advantage of using AMusicSoft is that it has a simple interface wherein features and other functions can easily be understood. See the detailed guide below.
- Begin with downloading the AMusicSoft Apple Music Converter application from its official page. After the successful download, install it on your device.
- Open the application and add the Apple Music files by marking the selection box before each song title was chosen.

- Select the output format to utilize for conversion as well as the output folder.
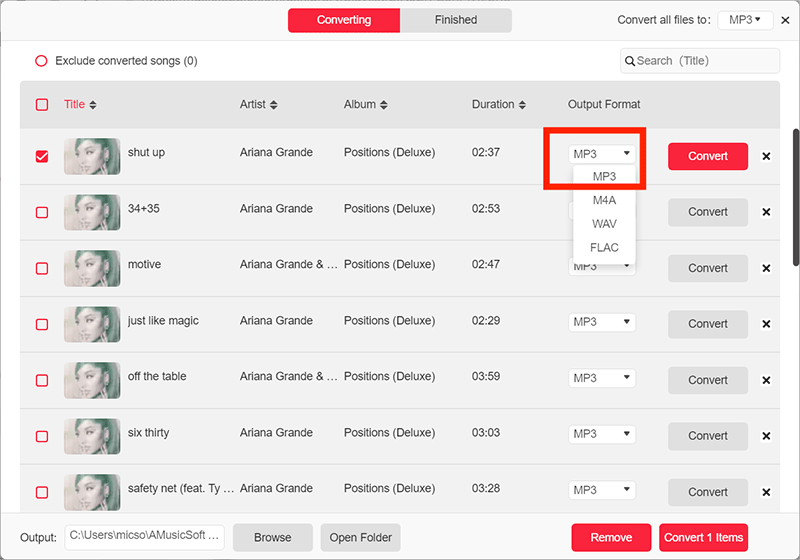
- Tap the Convert button, to begin with the process.

- Finally, once the conversion is done, download the results from the Converted menu.
Part 4. Conclusion
From the shared methods above about how to add music to Google Slides, you are free to select which one is the most effective and the simplest for you. By making sure that the guide is followed correctly, you can achieve the results that you want. On the other hand, you may use AMusicSoft Apple Music Converter to download and get the Apple Music tracks that you wish to add on your presentation.
People Also Read
- Learning How Music Files Can Be Rip From iTunes
- How To Convert M4P To MP3 Without iTunes
- All About Apple Music Unidays
- How to Add Apple Music on Android Tablet
- Can I Reset Apple Music ‘For You’ Suggestions?
- How To Listen To Apple Music Podcasts Easily On Any Device
- Why Does Apple Music Keep Deleting My Downloads?(Fixed)
- Fix Apple Music Not Downloading Songs To iPhone Problem
Robert Fabry is an ardent blogger, and an enthusiast who is keen about technology, and maybe he can contaminate you by sharing some tips. He also has a passion for music and has written for AMusicSoft on these subjects.