GarageBand Guide: How To Edit Songs In Garageband
You might not know, but the GarageBand app that is pre-installed on your iOS device is actually a very helpful tool when it comes to music editing. This application is designed with a lot of features and functions that can make each of your audio sound wonderful.
If you are now getting excited about how to edit songs in GarageBand, just read on as this post will tackle all the tips that you must know to get the most amazing audio.
Contents Guide Part 1. How to Cut Music on GarageBand on iOS and Mac?Part 2. More Editing Tips for GaragebandPart 3. Bonus: How to Get Your Apple Music Favorites and Listen to Them Offline?Part 4. Conclusion
Part 1. How to Cut Music on GarageBand on iOS and Mac?
The procedure of how to edit music in GarageBand for iPhone is just similar to how you do it on Mac. This will surely make it easier for you to understand the step-by-step guide and will also make the process quicker to finish. Below is the complete guide on how to edit songs in GarageBand on iOS devices and Mac.
On iOS
- Launch the GarageBand application on your device and then choose the particular project that you wish to edit and work on more.
- Choose the specific part in which the cut or split would be made. Seconds after, another window will show up wherein more editing options will be made. From the displayed options, tap on the Split button.
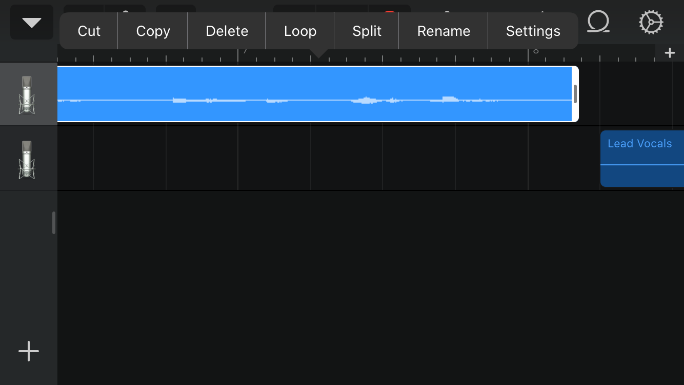
- The scissors icon will then show up within your track. Just slide the slider given into the exact location where the split is to be made.
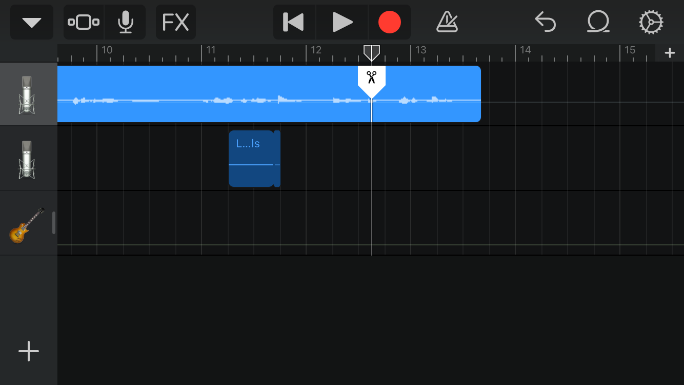
- After doing so, drag the icon into the part to proceed with cutting it.
On Mac
For those using Mac, select the audio region you want to split. Position the playhead where you want to split the audio region. Tap the Edit tab from the menu bar and choose the option of Split Regions at Playhead. You now have two separate audio regions.
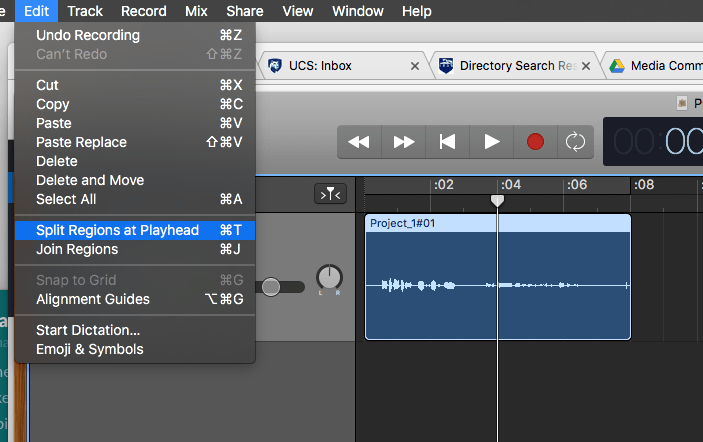
Another shortcut method to edit music in GarageBand using Mac is to place the play-head in the right place, then hit Command plus T. This will split your clip up into two segments, which can now be moved independently of each other.
Part 2. More Editing Tips for Garageband
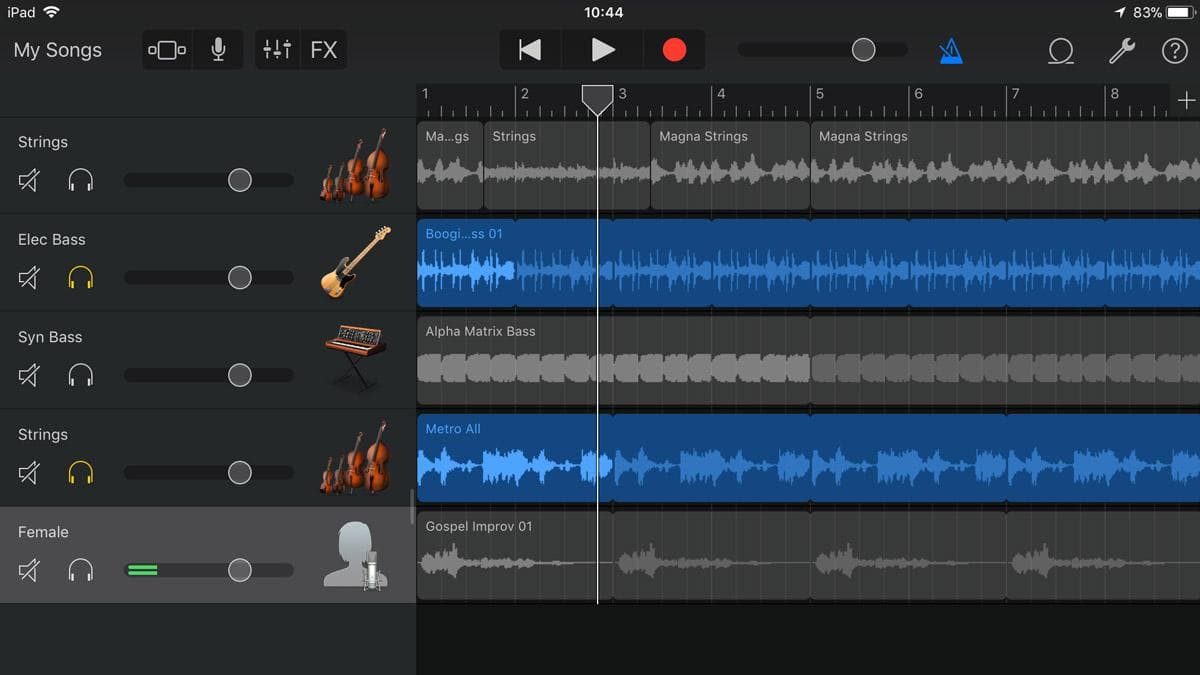
You can see below some of the most useful editing tools that are already available in GarageBand. You can choose among them whenever you edit audio in GarageBand, depending on the particular item that you wish to work on.
Track Controls Panel
One of the most common and usually used tool to edit songs in GarageBand is the track controls panel. You can easily access this panel by just swiping from the left side of your screen. From here, you will be able to see some functions like volume sliders, headphone icon and a mute button.
Quick Track Edits
In GarageBand, there is also a Quick Edits menu. This can be accessed by just hitting on the instrument icon located right before the track you have on the app. In here, you will see some of the most basic editing functions such as Delete, Duplicate, Rename, Automation, Merge, Show in Grid and other available icons that you may use to change the initially used one.
Merging Tracks
Another usual way to edit songs in GarageBand is with regards to merging two different tracks. In GarageBand, users are allowed to do a merging procedure on the titles to promote a lower space consumption on your drive. Take note that you can only save up to 8, 16 or 32 tracks in the GarageBand system, so merging of files is surely useful.
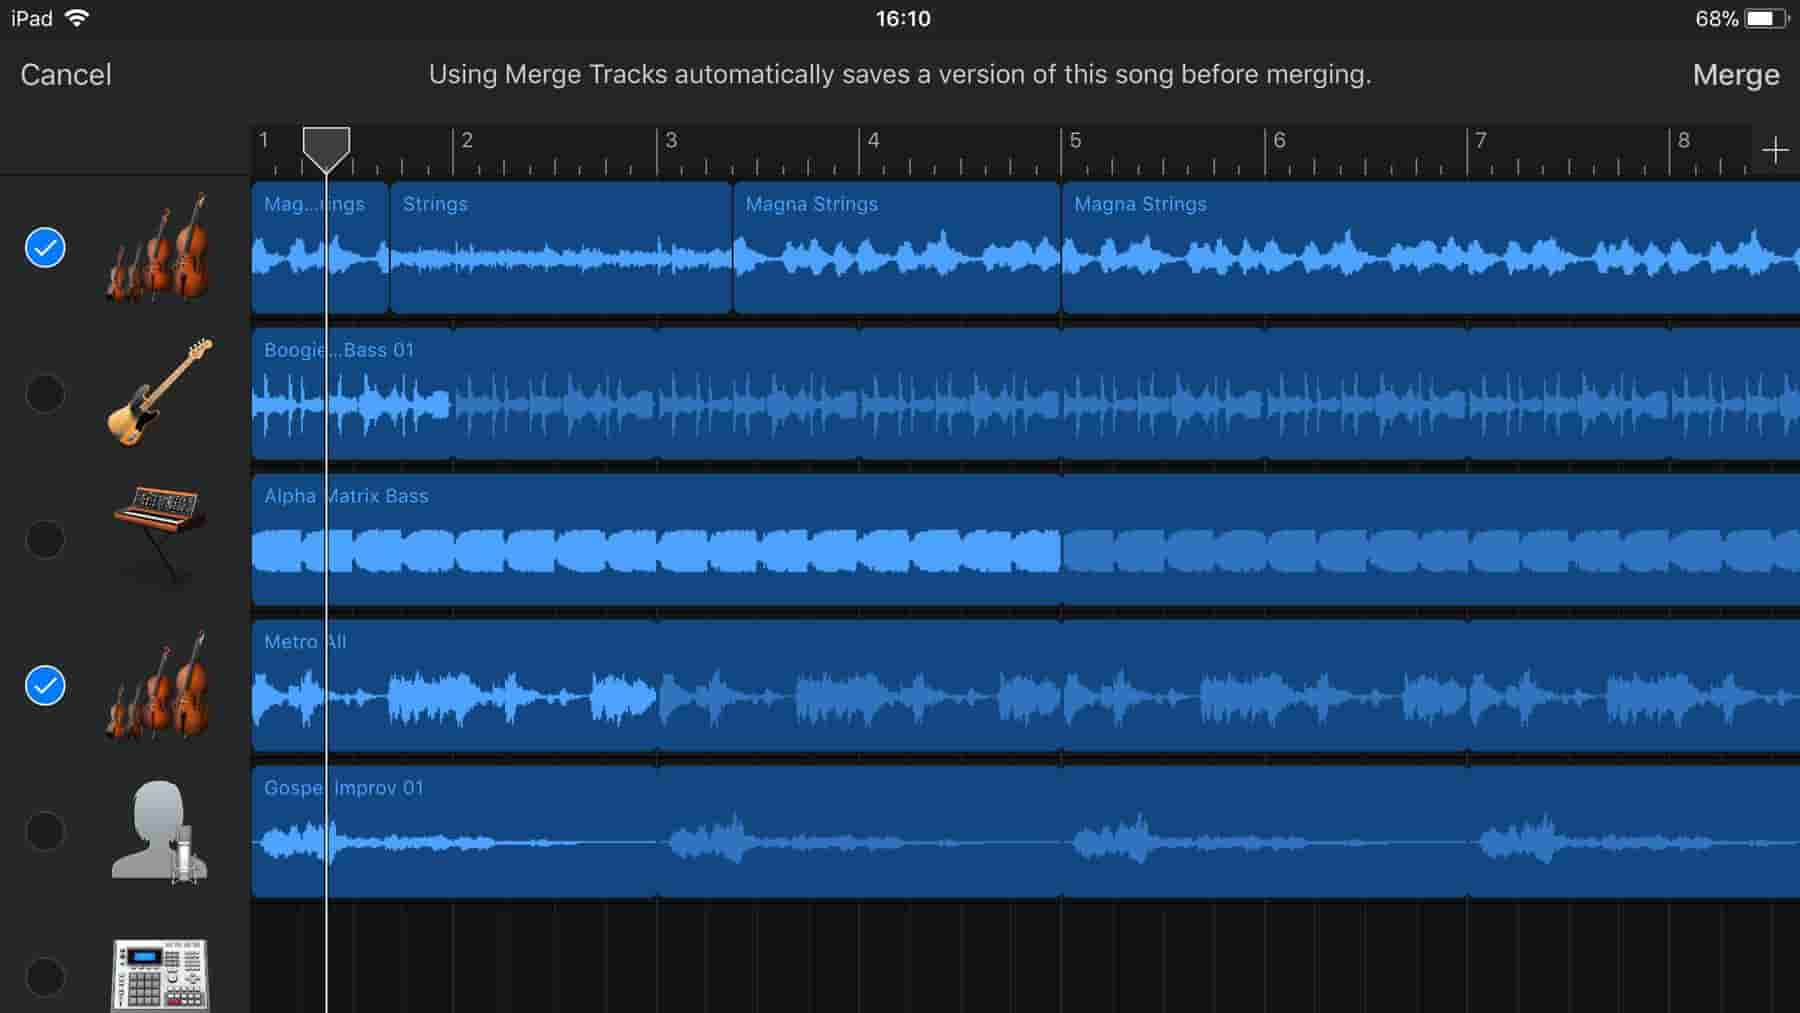
The Merge function can be seen in the Quick Edit menu as well.
Automating Tracks
When it comes to music editing, some users would want to emphasize a certain instrument sound, which is possible if you are to use the automation functions. In here, the manual adjustment of volume sounds is allowed, which can be done in any part of the song.
This function is also located in the Quick Edit menu.
Fine Tuning
If you are to edit a remix, it is definitely required that your composition is even. If not, then it could result to an unpleasant sound. To get done with this, you may utilize the Mute function which can mute any sound selected. This is recommended in order to see the effect of the audio selected in the overall composition. You can also try on other functions to edit songs in GarageBand regarding fine tuning.
Part 3. Bonus: How to Get Your Apple Music Favorites and Listen to Them Offline?
Previously, we have known about the best tips on how you can edit songs in GarageBand. Apart from this app, you can also find the Music app on your iOS device. Apple Music service will ask you to get a subscription in order to stream your favorite music tracks without limit. If you are subscribed in it, you have all the right to download the tracks you love and play them offline. But what if you do not have one, how can you save your favorites?
The best way to do this is via AMusicSoft Apple Music Converter. You can download the music files, convert them into a supported format and then cancel your current subscription. After that, you can have the converted ones transferred from any device you want and stream them anytime offline or online. This only means that you can enjoy your favorites unlimitedly. The available formats that you can have from using AMusicSoft are MP3, WAV, FLAC, AAC, AC3 and M4A. So you can play iTunes music on Alexa or other media players such as PS4, Roku TV, etc.
AMusicSoft can also remove the DRM from Apple Music and can give you the results in just a short time with the help of its 16x working speed. The steps are even easy and simple to understand.
How to Use AMusicSoft Apple Music Converter?
- To download iTunes library using this tool, you should begin with the download and installation of the application on your computer. Just open your browser and navigate to the website of AMusicSoft. From here, click the Products tab and select the Apple Music Converter option. Tap the Download button then.
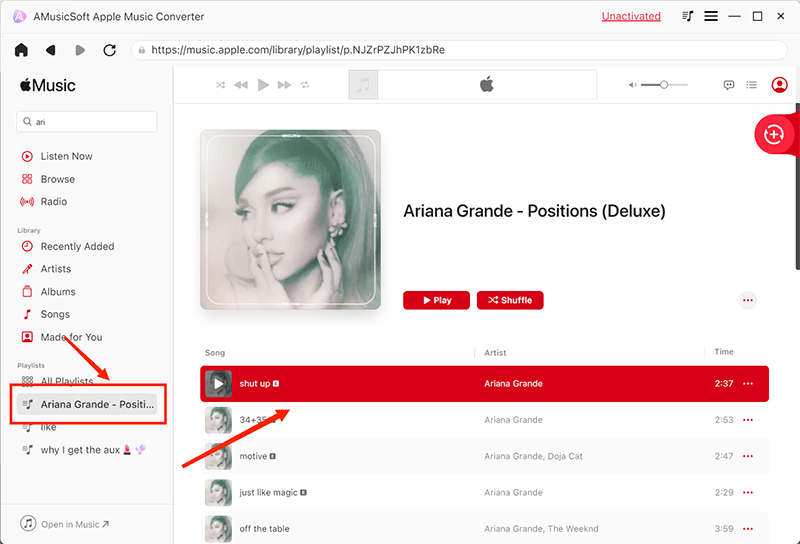
- Now, add the files to convert by choosing and ticking on the box before your selected song title.
- From the formats available on AMusicSoft, select one. This should be followed by allotting the output folder to use when results are out for download.
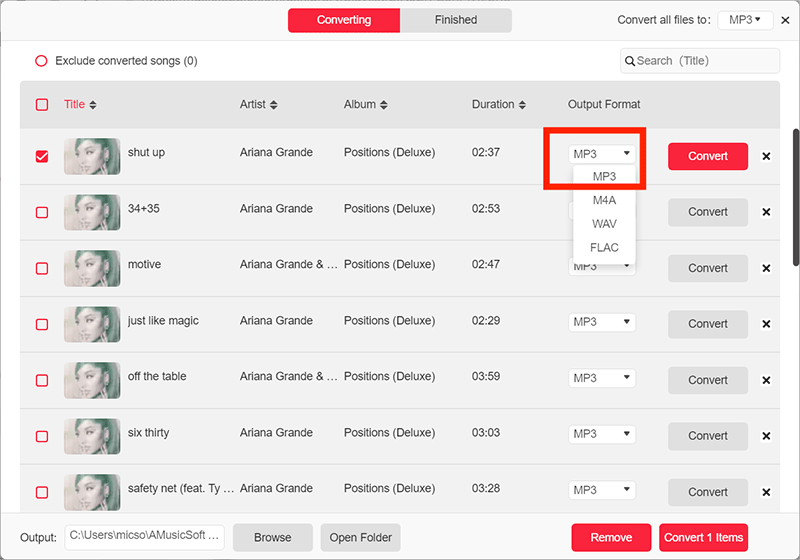
- Once finished, hit the Convert button and wait for conversion to get done.

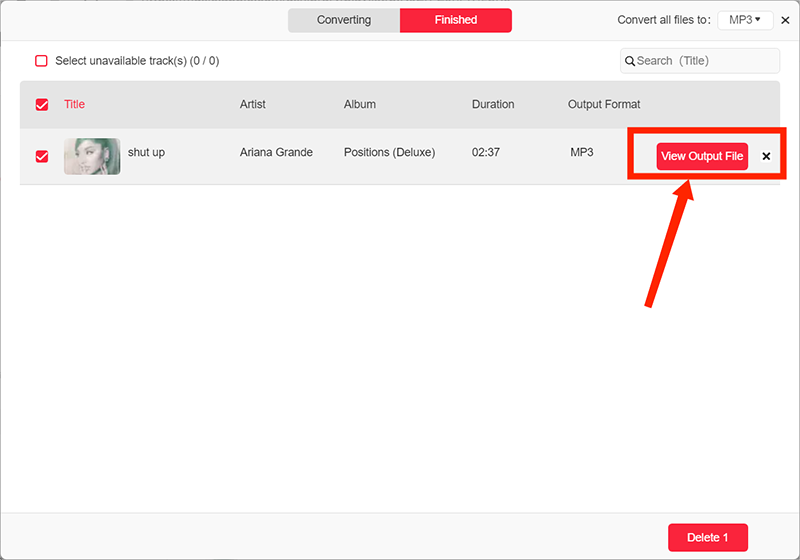
- Lastly, save all the converted files as local files on your device.
Part 4. Conclusion
Aside from the tackled tools that can be used to edit songs in GarageBand, you can still try more such as MIDI editing and Quick Regions edits. Along with the tools mentioned earlier, you can use all of them in a single edit to come up with your desired quality. On the other hand, if you suddenly have the need to download your favorite files from the Apple Music service, you can always use AMusicSoft Apple Music Converter.
People Also Read
- How To Organize And Rename Albums In iTunes
- Easy Methods For Getting Your Own iPhone Custom Ringtone
- Apple Music App Is Installing To Non-Apple Devices To Play
- Guide To Streaming Drake’s More Life On Apple Music
- Easy Way Of Adding Music To Slideshow
- What Is iTunes Store Audio Format And How To Play?
- How To Play Windows Media On Mac [Best Three Solutions]
- Music Streaming Service Comparison: Which Is Better
Robert Fabry is an ardent blogger, and an enthusiast who is keen about technology, and maybe he can contaminate you by sharing some tips. He also has a passion for music and has written for AMusicSoft on these subjects.